Chapter 10 - Sessions and User Accounts
Some web applications need to keep state and maintain a session with their users in order to provide a specific service. This is the case, for example, of e-commerce sites, which must remember the content of a user's shopping cart between two successive requests, whether or not the user is logged in to their account.
In this chapter we present the fundamental principle that makes it possible to maintain a session between a web server and a user. We then describe how to implement this principle with cookies. Finally, we explain one way to manage user accounts stored in a database and how to use sessions in this context.
The concept of session
HTTP is a stateless protocol, because it defines no native way of remembering state between requests. Using plain HTTP, that is, without adding information to requests and responses, it is not possible, for example, to know whether two requests were sent by the same user or by two different users.
To deal with this characteristic of the HTTP protocol, web servers set up their own mechanism to create state across requests: this is the concept of session.
A session is created and maintained by a web server and makes it possible to recognize the requests sent by one user among those sent by other users.
A session is created by the web server when it receives a request from a user it does not know. Once created, the session is stored on the web server, in memory or in a database. A session belongs to a single user. It contains all the information useful for handling that user's requests.
For each session to stay linked to a user, the web server assigns a unique identifier to each session, sends this identifier in the response it returns to the user, and asks the user to send this identifier back with every new request. This way, the web server can recognize the requests sent to it, find the sessions they belong to, and obtain all the information stored in these sessions.
Figure 10.1 illustrates how a session works. You can see that the session is created by the web server and that the session identifier is sent in all subsequent requests. This identifier lets the web server find the corresponding session and thus all the data needed to handle the requests. Although we say that the session links a web server and a user, you must understand that the web browser is what sends requests to the web server; the session therefore links a web browser and a web server.
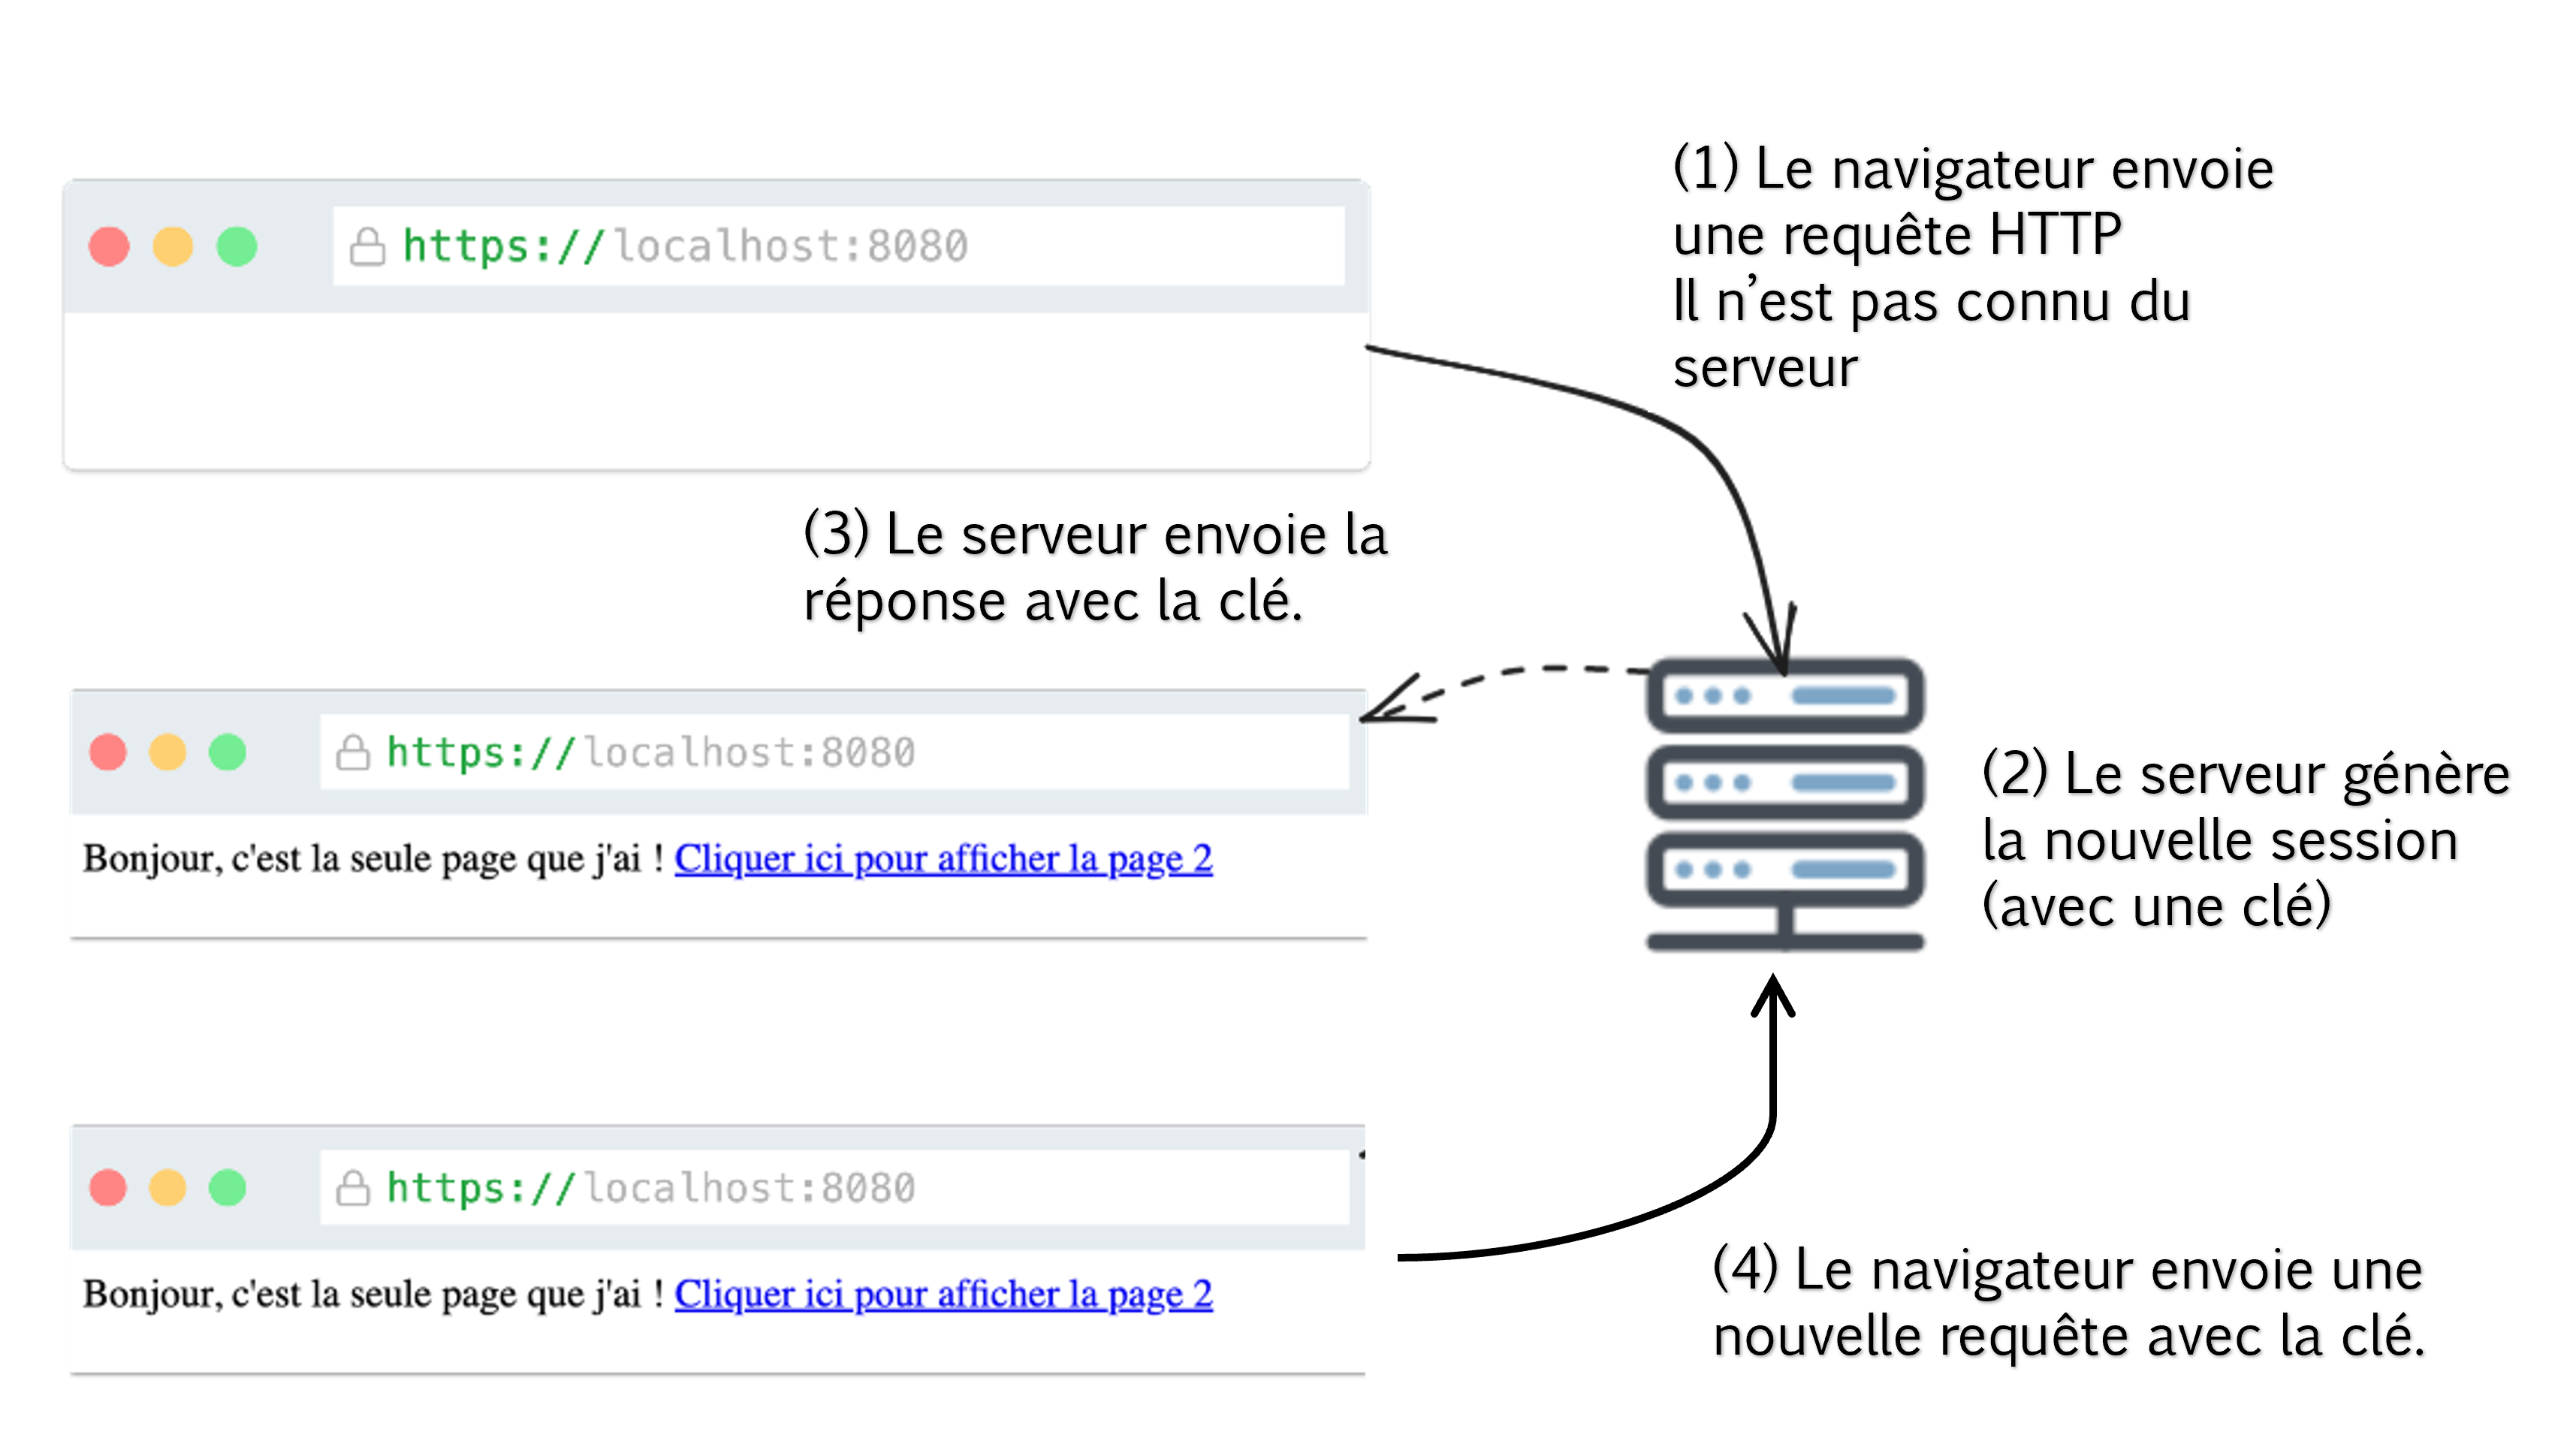
Figure 10.1: Setting up a session between a web browser and a web server.
Cookies
To set up the session mechanism, the web server must send the session identifier to the web browser and ask it to send it back with every new request. Without this identifier added to every request, the web server cannot find the corresponding session.
There are several ways to transmit the session identifier.
The most common (and oldest) solution is to use the HTTP cookie mechanism, which was designed for this very purpose.
The creation of a cookie is requested by the web server.
It simply adds a Set-Cookie header to the response it sends.
The content of the Set-Cookie header is the content of the cookie that the web browser will store and send back with every request.
For example, if the response to an HTTP request contains the header Set-Cookie: session-id=1234567890, the browser receiving this response creates a cookie containing the key session-id with the value 1234567890.
When this browser sends requests to the web server again, it adds the content of this cookie to the request headers (Cookie: session-id=1234567890).
Setting up a session with cookies is therefore quite natural. If the web server receives a request without a cookie, it creates a new session and, in the response, asks the web browser to store a new cookie containing the session identifier. This way, every new request sent by the web browser contains the cookie, and the web server can find the corresponding session.
Code 10.1 shows how a server sets up sessions with cookies.
The goal here is to set up sessions that count the number of visits made by a user.
Sessions have a unique identifier that starts at 0 and is incremented with each new session created (variable lastSessionId).
Sessions are stored in an array (variable sessions).
When the server receives a request, it checks whether the cookie containing the session identifier is present in the request.
This is done by looking at the request headers (req.headers['cookie']) and searching for the key session-id.
If the request contains no cookie, or if the cookie does not contain the key session-id, the web server creates a new session and sends a cookie containing the session identifier in the response.
If, on the contrary, the request contains the cookie with the key session-id, the web server retrieves the session identifier and increments the number of visits (nbVisites) of the corresponding session.
const http = require("http");
const host = 'localhost';
const port = 8080;
const server = http.createServer();

let lastSessionId = 0;
let sessions = [];

server.on("request", (req, res) => {
    if (req.url === '/') {
        let hasCookieWithSessionId = false;
        let nbVisites = 1;
        if (req.headers['cookie'] !== undefined) {
            let sessionIdInCookie = req.headers['cookie'].split(';').find(item => item.trim().startsWith('session-id'));
            if (sessionIdInCookie !== undefined) {
                let sessionId = parseInt(sessionIdInCookie.split('=')[1]);
                if (sessions[sessionId]) {
                    hasCookieWithSessionId = true;
                    nbVisites = ++sessions[sessionId].nbVisites;
                }
            }
        }

        if (!hasCookieWithSessionId) {
            lastSessionId++;
            res.setHeader('Set-Cookie', `session-id=${lastSessionId}`);
            sessions[lastSessionId] = {
                'nbVisites': nbVisites
            }
        }
        let html = '<html><body><h1>Page</h1><p>Number of visits: ' + nbVisites + '</p></body></html>';
        res.end(html);
    }
});

server.listen(port, host, () => {
    console.log(`Server running at http://${host}:${port}/`);
});
Code 10.1: Using cookies to implement the session mechanism.
The example in Code 10.1 shows the difference between the user session, stored here in memory in the sessions array, and the cookies, which only contain the session identifier.
It is indeed not recommended to put the whole session in cookies, because it can represent a large amount of data and can cause security problems.
It is better to store the session data on the web server and only send the session identifier in cookies.
crypto.randomUUID() in NodeJS, and the cookie should be marked HttpOnly (and Secure over HTTPS).
User accounts
The concept of session naturally leads to setting up a mechanism to manage user accounts. The goal is to provide a way to authenticate users and let them log in to their account. There are many ways to set up such a mechanism. Here we propose a simple solution that follows basic security recommendations. Be careful: this section in no way claims to be sufficient for building a robust and reliable account management system. Its purpose is to present the basic notions.
A user account is usually defined by a username and a password.
To improve security, it is strongly discouraged to store the password in a database.
It is better to store a hash of the password.
A hash is a value obtained by applying a cryptographic algorithm such as SHA-256.
Moreover, so that two identical passwords are not represented by the same hash in the database, it is recommended to add a random value (called a salt) to the password before applying the cryptographic algorithm.
The table of user accounts then contains three fields: username, salt and hash.
Code 10.2 gives the SQL statement that creates the accounts table, which will contain the user accounts.
Note that we chose the BYTEA type here, which stores binary data, as is the case for the salt and the hash.
CREATE TABLE accounts (
    id SERIAL PRIMARY KEY,
    username VARCHAR(100) NOT NULL,
    salt BYTEA,
    hash BYTEA
);
Code 10.2: Creating the accounts table in SQL.
Code 10.3 shows how to compute a hash from a password.
We chose to use crypto, the standard library provided by NodeJS for cryptographic operations.
Line 4 imports this library.
The salt is generated randomly with the randomBytes method.
The hash is built from the password and the salt with the createHash and update methods.
const username = "moi"; // sent by the user
const password = "supersecret"; // sent by the user

const crypto = require("crypto");
const salt = crypto.randomBytes(16).toString('hex');
const hash = crypto.createHash("sha256").update(password).update(salt).digest("hex");
Code 10.3: Using NodeJS's crypto library to generate a random salt and build a hash from the password.
Once the salt and the hash have been obtained, they just need to be stored in our database.
To do this, we use the pg driver presented in the third part of this book, which interacts with the Postgres database.
Code 10.4 shows how the SQL query inserting a new user account is built.
Here we used the SQL function decode, which converts the data to the BYTEA format.
const insertQuery = `INSERT INTO accounts (username, salt, hash) VALUES ('${username}', decode('${salt}','hex') , decode('${hash}','hex'));`;
await client.query(insertQuery);
Code 10.4: Inserting the username, the salt and the hash into the table of user accounts.
An account is verified by comparing the username and password sent by a user with those stored in the database.
Since the user only sends their password, the corresponding hash must be generated and compared with the one stored in the database.
Code 10.5 shows the code needed for this.
The SQL query uses the encode function, which converts from the BYTEA type.
If the query succeeds (a user with the right username is in the database), the salt and the true hash (trueHash) can be retrieved.
If it returns no row, there is no account with this username in the database.
Finally, the hash from the database is compared with another hash built from the password sent by the user.
If the two hashes are identical, the user is authenticated.
const username = "moi"; // sent by the user
const password = "supersecret"; // sent by the user

const findQuery = `select username, encode(salt,'hex') as salt, encode(hash,'hex') as hash from accounts where username='${username}'`;
const findResult = await client.query(findQuery);
const USERNAME_IS_UNKNOWN = 0;
if (parseInt(findResult.rows.length) !== USERNAME_IS_UNKNOWN) {
    const salt = findResult.rows[0].salt;
    const trueHash = findResult.rows[0].hash;
    const computedHash = crypto.createHash("sha256").update(password).update(salt).digest("hex");
    if (trueHash === computedHash) {
        //SUCCESS
    }
}
Code 10.5: Comparing the information sent by the user with what is stored in the database.
crypto.scrypt (built into NodeJS), bcrypt or Argon2. Second, the SQL queries are built by concatenating the username typed by the user, which allows SQL injection; use parameterized queries instead (see chapter 8): client.query('SELECT ... FROM accounts WHERE username = $1', [username]).
Sessions and user accounts
Code 10.6 combines the session mechanism with the creation of user accounts. Sessions are established from the first request made by a user, whether or not they have an account. Sessions are handled on every request, for every requested URL (lines 28 to 48).
User accounts are handled with the routes /signin (logging in to an account) and /signup (creating a new account).
These routes exist in GET and POST versions.
The GET version only returns a form in which the user can enter their username and password.
To make the code easier to read and reduce redundancy, we defined a single function to generate the forms (function generateSignFormPage on line 124).
The POST version of the /signup route creates a new user account.
It must check that the username is not already in the database.
If it is not, a random salt is generated, then the hash is computed.
The account is then created and stored in the database.
The POST version of the /signin route performs authentication.
It compares the hash stored in the database with the one generated from the password sent by the user.
Line 97 contains the test that determines whether a user has sent a correct username and password.
If so, we simply add the username to the session.
Lines 111 to 121 represent the rest of the application, which is very limited here. We only check whether the user is logged in. If they are, we show a home page with their username. If not, we send back a page that lets them log in or create an account. This example shows the first principles of account management with session tracking.
const http = require("http");
const crypto = require("crypto");
const { Client } = require('pg');
const host = 'localhost';
const port = 8080;
const server = http.createServer();

const client = new Client({
    user: 'postgres',
    password: 'root',
    database: 'chap10',
    port : 5432
});

client.connect()
    .then(() => {
        console.log('Connected to database');
    })
    .catch((e) => {
        console.log('Error connecting to database');
        console.log(e);
    });

let lastSessionId = 0;
let sessions = [];

server.on("request", (req, res) => {
    let hasCookieWithSessionId = false;
    let sessionId = undefined;
    if (req.headers['cookie'] !== undefined) {
        let sessionIdInCookie = req.headers['cookie'].split(';').find(item => item.trim().startsWith('session-id'));
        if (sessionIdInCookie !== undefined) {
            let sessionIdInt = parseInt(sessionIdInCookie.split('=')[1]);
            if (sessions[sessionIdInt]) {
                hasCookieWithSessionId = true;
                sessionId = sessionIdInt;
                sessions[sessionId].nbRequest++;
            }
        }
    }
    if (!hasCookieWithSessionId) {
        lastSessionId++;
        res.setHeader('Set-Cookie', `session-id=${lastSessionId}`);
        sessionId = lastSessionId;
        sessions[lastSessionId] = {
            'nbRequest': 0
        }
    }
    if (req.url === '/signup' && req.method === 'GET') {
        res.end(generateSignFormPage(true));
    } else if (req.url === '/signup' && req.method === 'POST') {
        let data = '';
        req.on("data", (dataChunk) => {
            data += dataChunk.toString();
        });
        req.on("end", async () => {
            try {
                const params = data.split("&");
                const username = params[0].split("=")[1];
                const password = params[1].split("=")[1];
                const findQuery = `select count(username) from accounts where username='${username}'`;
                const findResult = await client.query(findQuery);
                const USERNAME_IS_UNKNOWN = 0;
                if (parseInt(findResult.rows[0].count) === USERNAME_IS_UNKNOWN) {
                    const salt = crypto.randomBytes(16).toString('hex');
                    const hash = crypto.createHash("sha256").update(password).update(salt).digest("hex");
                    const insertQuery = `INSERT INTO accounts (username, salt, hash) VALUES ('${username}', decode('${salt}','hex') , decode('${hash}','hex'));`;
                    await client.query(insertQuery);
                    res.end(`<html><body><h1>Sign Up is a Success</h1><a href="/signin">You can sign in now !</a></body></html>`);
                } else {
                    res.end(`<html><body><h1>Sign UP Failure</h1><div>Username already signed up !</div><a href="/">Retry</a></body></html>`);
                }
            } catch(e) {
                console.log(e);
                res.end(`<html><body><h1>Failure</h1><a href="/">Retry</a></body></html>`);
            }
        });
    } else if (req.url === '/signin' && req.method === 'GET') {
        res.end(generateSignFormPage(false));
    } else if (req.url === '/signin' && req.method === 'POST') {
        let data = '';
        req.on("data", (dataChunk) => {
            data += dataChunk.toString();
        });
        req.on("end", async () => {
            try {
                const params = data.split("&");
                const username = params[0].split("=")[1];
                const password = params[1].split("=")[1];
                const findQuery = `select username, encode(salt,'hex') as salt, encode(hash,'hex') as hash from accounts where username='${username}'`;
                const findResult = await client.query(findQuery);
                const USERNAME_IS_UNKNOWN = 0;
                if (parseInt(findResult.rows.length) !== USERNAME_IS_UNKNOWN) {
                    const salt = findResult.rows[0].salt;
                    const trueHash = findResult.rows[0].hash;
                    const computedHash = crypto.createHash("sha256").update(password).update(salt).digest("hex");
                    if (trueHash === computedHash) { //AUTHENTICATED
                        sessions[sessionId].username = username;
                        res.end(`<html><body><h1>Sign In Success</h1>Welcome ${username}. Visit <a href="/">our site</a> </body></html>`);
                    } else {
                        res.end(`<html><body><h1>Sign IN Failure</h1> Wrong Password ! <a href="/signin">Retry</a></body></html>`);
                    }
                } else {
                    res.end(`<html><body><h1>Sign IN Failure</h1> Wrong Username ! <a href="/signin">Retry</a></body></html>`);
                }
            } catch(e) {
                console.log(e);
                res.end(`<html><body><h1>Something goes wrong</h1> <a href="/">Retry</a></body></html>`);
            }
        });
    } else {
        if (sessions[sessionId].username) {
            res.end(`<html><body><h1>Welcome ${sessions[sessionId].username}</h1>Visit <a href="/">our site</a> </body></html>`);
        } else {
            let html = `<html><body><h1>Please SignIn or SignUp !</h1>
            <div><a href="/signup">SignUp with username and password</a></div>
            <div><a href="/signin">Sign in  !</a></div>
            </body></html>`;
            res.end(html);
        }
    }
});

function generateSignFormPage(up) {
    let signWhat = up ? 'signup' : 'signin';
    return `<html><body><h1>${signWhat}</h1>
            <form action='/${signWhat}' method="POST">
                <label for="username">Username: </label>
                <input type="text" name="username" id="username" required>
                <label for="password">Password: </label>
                <input type="password" name="password" id="password" required>
                <input type="submit" value="${signWhat}!">
            </form>
            </body></html>`;
}

server.listen(port, host, () => {
    console.log(`Server running at http://${host}:${port}/`);
});
Code 10.6: User accounts and sessions.
This chapter presents the concept of session and one way to manage user accounts. Remember the following three points:
- HTTP is a stateless protocol that offers no native mechanism for managing sessions or user accounts.
- Sessions are implemented on the web server side. To link them with web browsers, sessions must be uniquely identified and browsers must be asked to send the session identifier back with every request. Cookies, small pieces of text stored by browsers at the request of web servers, meet this need.
- Account management requires a database that stores only a hash of the password, obtained by applying a cryptographic algorithm. Checking a password means computing a hash and checking that it matches the one stored in the database.
Practice
Review questions
What is a session?
- a) A mechanism set up by web servers to know whether the requests they receive come from the same client.
- b) A mechanism set up by the web browser to remember all the requests sent to the same server.
- c) A mechanism supported by HTTP to keep a relationship between a client and a server.
What is a session identifier used for?
- a) To find a session in an array of sessions.
- b) To avoid rebuilding a session for a browser when it already exists on the server.
- c) To keep a link between the server and the browser. The server gives the session identifier to the browser and asks it to send it back with every request so that it can find the session.
What is a cookie?
- a) A file left on a server by a hacker to show that they hacked the website.
- b) A code kept in memory by the browser that maintains the session with the web server.
- c) A small piece of data stored by the browser at the server's request, whose content is sent with every request to that server.
Why are cookies used with sessions?
- a) Because they let web servers store session identifiers in web browsers, and make browsers send the session identifiers every time they send requests.
- b) Because they let web browsers send all their personal information to servers. With this information, web servers can find the sessions.
- c) Because they store the identifiers of all the requests sent to a web server. With these request identifiers, the web server can find the web browser's session.
Should users' logins and passwords be stored in a database?
- a) Yes, otherwise you cannot check that the password sent by the user is the right one.
- b) No, you should store a hash of the password. Otherwise an attacker who gets the database would know all the passwords.
- c) No, the password should never be stored. Keeping it in the session is enough.
Answers: 1-a, 2-c, 3-c, 4-a, 5-b
Exercise 1 - Dark mode / light mode
The goal of this exercise is to build a website with two possible display modes (dark and white).
The user can choose their display preference. This preference must be stored in a cookie.
Build a website with a single web page containing a title and some text (choose any title and text you like). Make sure this web page is generated dynamically by the website and that it is served whatever URL is requested.
Add a style with two CSS rules directly in the web page (use the
<style>tag to add the style to the web page). The first rule targets the class dark and sets black as the background color and white as the text color. The second rule targets the class white and sets the opposite colors. By default, the web page is in white mode (the<body>tag has the class white).Add a cookie mechanism to your web server that stores the chosen display mode in the cookie (key mode, value dark or white). Using your browser's developer tools, check that your cookie contains the key mode and that white is the value stored by default (on your first visit to the web page).
Modify your web server so that the class of the
<body>tag equals the display mode stored in the cookie. You must read the cookie, find the value of the key mode and assign this value to the class of the<body>tag.Finally, add a new route to your web server (GET route /mode) that toggles the display mode (dark becomes white and vice versa). This route must also ask the browser to store the new mode value in its cookie. Finally, this route must send back a redirect to the main page using the HTTP mechanism (status code 302). The user should then see the main page in the new display mode.
Add a hyperlink (
<a>tag) to the /mode route in your web page so that the user can change mode by clicking on the link.
Project - Image wall
We will continue our project that displays images (see Chapter 9, project).
The goal here is to add user accounts to our application. A new user must be able to sign up, sign in and sign out.
You can see the expected result here.
Take the code you wrote in chapter 9 and copy it into a new directory named chap10-projet.
Add cookie handling to your project to set up sessions.
Add the routes /signup and /signin so that a new user can sign up and sign in. Add the accounts table to your database. Also add the web pages for signing up and signing in.
Add hyperlinks to the sign-up and sign-in pages on the home page of your application. Place these links at the top right of the page.
Modify the home page so that the sign-up and sign-in links disappear when the user is signed in.
Modify the home page so that the name of the signed-in user is displayed.
Add a sign-out route and a hyperlink to it on the home page. This link must only be visible when the user is signed in.
We now want to let signed-in users like pictures.
You can see the expected result here.
Modify the image wall to add a like link under each image (an
<a>tag under each image). The URL of a link must be /like/i, where i is the id of the image. Make sure these links are only visible when the user is signed in.Add the route /like/i to your server to handle likes. To do this, add a new table to your database (accounts_images_likes). Receiving a request on /like/i must add a row to this table.
Modify the image wall to show the images liked by the signed-in user (only if the user is signed in). Query the accounts_images_likes table to display liked under the images that have been liked. Make sure that liked images cannot be liked again (the hyperlink to /like/i must not be displayed).