Chapter 5 - The HTTP Protocol
All communication between a browser and a web server goes through the HTTP protocol. HTTP is a high-level protocol built on top of the TCP Internet protocol (or QUIC for HTTP/3).
A detailed knowledge of the HTTP protocol is needed to fully understand the interactions that can take place between a browser and a web server.
This chapter presents the basic principles of the HTTP protocol. It focuses on GET and POST requests, which are the most widely used requests in web applications. It describes how information is transmitted between a client and a server.
HTTP requests and responses
HTTP is a client-server communication protocol: exchanges are initiated by the client (the web browser), and the web server merely responds to the client. A web server therefore cannot send a request to a web client. To do that, another protocol must be used, such as WebSockets, which we do not cover in this book.
HTTP is a request-response protocol: the web browser sends a request to the web server and the web server responds to that request. The web server therefore cannot send more than one response to a request made by a web browser. As a result, if a web browser wants to obtain several resources, it must send one request per resource. It will receive each resource in a separate response.
Knowing that HTTP is client-server and request-response helps you better understand how a web browser and a web server interact. It explains why displaying a web page containing an image wall takes several requests. A first request is sent by the web browser as soon as the user has entered the URL of the page's HTML code (the client-server model requires a first action by the user). Then, once the web browser has received the page's HTML code, it sends as many requests as there are images referenced in the HTML code (the request-response model requires several requests to be sent, even though the web browser does this transparently).
HTTP requests and responses are text messages. Requests are structured in three parts:
- The command, which is entirely defined on the first line of the request. A command specifies (1) the type of request (GET, POST, etc.), (2) the requested URL and (3) the protocol version supported by the browser that sent the request. For example, the command GET http://localhost:8080/public/index.html HTTP/1.1 (1) is of type GET, (2) requests the resource index.html and (3) complies with version 1.1 of the HTTP standard.
- The headers, which contain additional information about the request. For example, the header Accept: text/html indicates that the web browser accepts a response in HTML format. Headers are defined from the second line of the request onward as key-value pairs (one header per line). Browsers send many headers to optimize their interactions with web servers. We will describe some of them later in this chapter.
- The request body, which contains the data to send to the web server. It is optional and only used by some types of requests (POST but not GET). It is separated from the headers by an empty line.
Code 5.1 shows an example of a GET request sent by a web browser to obtain a resource whose URL is http://localhost:8080/public/index.html.
This request contains a single header specifying that the browser accepts responses in HTML format.
GET http://localhost:8080/public/index.html HTTP/1.1
Accept: text/html
Code 5.1: An example of a GET request sent to obtain the index page.
HTTP responses, for their part, consist of the following three parts:
- The status line, which specifies the version of the HTTP protocol and defines the status code of the response. For example, the status line HTTP/1.1 200 OK indicates that the response uses version 1.1 of the HTTP standard and that the request was processed successfully (code 200). There are many status codes. The best known are 200, which means the request was processed successfully, 404, which means the requested resource was not found, and 500, which means the server encountered an error.
- The headers, which contain additional information about the response. The Content-Length and Content-Type headers in particular give information about the data contained in the response body.
- The response body, which contains the resources returned by the web server.
Code 5.2 shows an example of a response. The response contains the HTML code of the requested web page (lines 4 to 11 are the response body). The HTML code is sent to the web browser, which can then display it.
HTTP/1.1 200 OK
Content-Type: text/html

<!DOCTYPE html>
<html>
<body>
    <h1>Welcome</h1>
    <a href="images.html">Click here to see the image wall</a>
    <div> <img src="image1_small.jpg"></div>
</body>
</html>
Code 5.2: An example of a response to the previous request.
The type of an HTTP request, defined in the command part of the request, specifies the intent of the request. Although the HTTP standard defines nine types of requests, we only present the two most used: GET and POST. GET requests are mainly used to retrieve resources (GET = obtain a resource). POST requests are mainly used to send data to the web server (POST = send). Note that GET requests do not carry data in their body, whereas POST requests can.
HTTP and the web browser
Since HTTP is a client-server protocol, the web browser initiates all communication with the server. This can happen through the browser's address bar or through the interactions supported by HTML, such as clicking on hyperlinks or submitting forms.
The address bar is the first way a user interacts with a web browser. By typing the address of the web page they want to display into the browser's address bar, the user asks the browser to send a GET request and display the result. For example, if the user types the URL http://localhost:8080/public/index.html in the browser's address bar, the browser sends the GET request shown in Code 5.1. If the response it receives is that of Code 5.2, it then takes the HTML code from the body of this response and displays the corresponding web page.
When the browser receives an HTTP response containing HTML code, it identifies all the HTML tags that reference other resources and sends, in parallel, as many GET requests as needed to retrieve these resources before displaying the page. Tags that reference resources include <img>, <video>, <link> and <script>. In our example, the index page contains a reference to an image. The browser therefore sends a GET request for this image in order to display it in the web page.
Once a web page is displayed, the browser waits for the user to interact with it before sending other requests. Two HTML tags support user interaction: <a> and <form>.
The <a> tag is used to create hyperlinks to other web pages. Its href attribute specifies the URL of the target web page. When the user clicks on a hyperlink, the browser sends a GET request to the URL specified in the href attribute of the <a> tag. Code 5.3 shows an example of HTML code containing a hyperlink. This hyperlink points to the resource images.html, a web page containing an image wall.
<!DOCTYPE html>
<html>
<body>
    <h1>Welcome</h1>
    <a href="images.html">Click here to see the image wall</a>
    <div> <img src="image1_small.jpg"></div>
</body>
</html>
Code 5.3: An example of a hyperlink.
Figure 5.1 shows the web page displayed in a web browser. The user can click on the hyperlink to access the web page images.html.
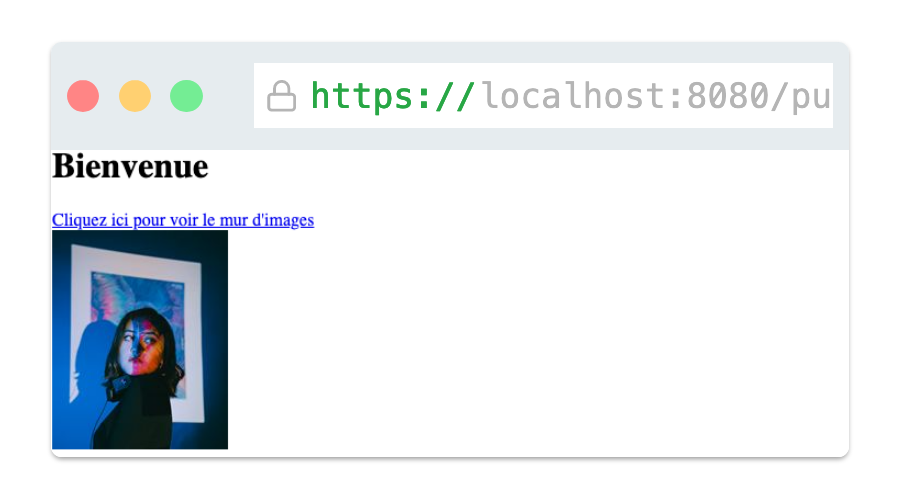
Figure 5.1: Display of the hyperlink of the web page whose HTML code is given in Code 5.3.
When everything goes well, the response to a click on a hyperlink has the status code 200 and contains the requested resource in its body. A browser receiving such a response then displays the requested resource. Figure 5.2 shows the result of the interaction between the user and the web browser after clicking on the hyperlink of the index page.
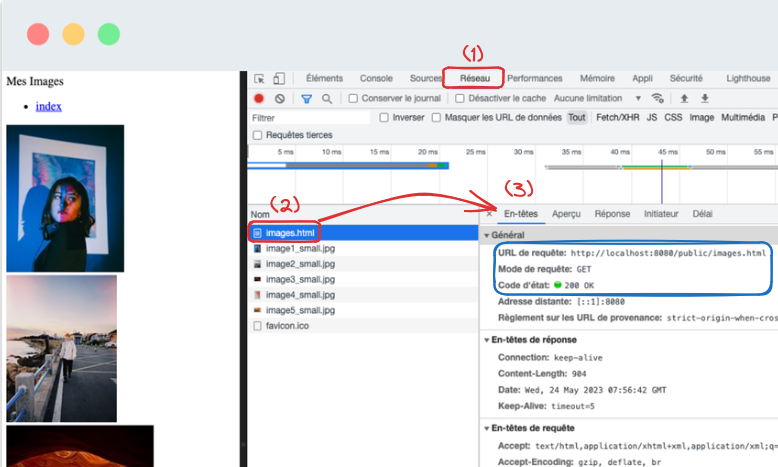
Figure 5.2: The browser after clicking on the hyperlink.
The figure shows the developer tools, and more precisely the network exchanges. You can see the various requests and responses exchanged between the browser and the web server. The figure shows details of the first request sent: the one for the page's HTML code. You can see that this request is a GET request and that its URL is http://localhost:8080/public/images.html. The response has a status code of 200. Its body contains the HTML code of the web page images.html. The other requests and responses shown in the figure retrieve the resources (images, CSS, JavaScript) referenced in the HTML code of the web page.
The second HTML tag that lets a user interact with a web browser and ask it to send a request is the <form> tag. The <form> tag displays a form inviting the user to enter data and send it to the web server. The fields of the form are declared with <input> tags inside the form. Each <input> tag can define the type of field (text, password, etc.) and the name of the variable that will hold the value entered by the user. Finally, a form must contain a button (an <input> tag whose type attribute is submit) used to submit the form.
For example, Code 5.4 shows a web page containing a form. This form lets the user enter an image number and a description for this image, and submit them.
<!DOCTYPE html>
<html>
<body>
    <h1>Image Description</h1>
    <form action="/description-image" method="post">
        <input type="number" name="image-number">
        <input type="text" name="description">
        <input type="submit" value="Send">
    </form>
</body>
</html>
Code 5.4: An example of an HTML form.
Submitting a form asks the browser to send a request containing the data entered by the user to the web server. The <form> tag declares the target URL of the submission in its action attribute and the type of request in its method attribute (POST or GET). If the method attribute of the <form> tag is POST, the request is a POST request. In this case, the browser sends the data in the body of the request. You can even specify how the data is encoded with the form's enctype attribute. By default, the data is encoded like URL parameters. If, on the other hand, the value of the method attribute is GET, the request is a GET request. In this case, the browser adds the data to the URL of the request. Code 5.5 shows an example of a POST request sent by the browser after the form of Code 5.4 is submitted. Code 5.6 shows an example of a GET request sent for the same form submission.
These two code examples show the default way data is encoded when a form is submitted.
POST http://localhost:8080/description-image HTTP/1.1
Accept: text/html

image-number=1&description=top
Code 5.5: An example of a POST request sent with form data. The data is encoded in the body of the request.
GET http://localhost:8080/description-image?image-number=1&description=top HTTP/1.1
Accept: text/html
Code 5.6: An example of a GET request sent with form data. The data is encoded in the URL of the request.
The choice between POST and GET for a form depends on the nature of the data to send. As soon as the data is complex or large, POST is preferable. Indeed, encoding data in a URL is limited by size: in practice, URLs should not exceed about 2,000 characters.
Finally, knowing the HTTP protocol helps you understand how a browser builds the URLs of the requests it must send. Every request sent by a browser must have a full URL that specifies the server's address, its port and the path of the target resource (see Chapter 1). These full URLs are built from the URLs contained in HTML tags (<a>, <form>, <img>, <link> tags, etc.). Indeed, these tags do not need to contain full URLs: you can, and it is even recommended to, use absolute or relative URLs.
An absolute URL defines a path that starts with the "/" character. For example, /public/image1_small.jpg is an absolute URL. An absolute URL contains no protocol, server address or port. To build a full URL from an absolute URL, the browser reuses the URL of the current page and takes its protocol, server address and port. For example, if the URL of the current page is http://localhost:8080/public/test-url, it takes the protocol http, the server address localhost and the port 8080. The absolute URL /public/image1_small.jpg becomes the full URL http://localhost:8080/public/image1_small.jpg.
A relative URL, on the other hand, defines a relative path that does not start with the "/" character. For example, image1_small.jpg is a relative URL. A relative URL contains no protocol, server address or port. To build a full URL from a relative URL, the browser takes the URL of the current page and keeps its protocol, server address, port and path up to the last /. For example, if the URL of the current page is http://localhost:8080/public/test-url, it keeps the protocol http, the server address localhost, the port 8080 and the path /public/ (up to the last /, so test-url is dropped). The relative URL image1_small.jpg becomes the full URL http://localhost:8080/public/image1_small.jpg.
For example, Code 5.7 shows a web page obtained via the URL http://localhost:8080/public/test-url. This page contains three <img> tags with the three types of URL: full, absolute and relative. Before sending the GET requests to retrieve the images, the browser builds the full URLs. It has nothing to do for the first URL, which is already full. For the second URL, it reuses the protocol, the server address and its port. For the third URL, it reuses the protocol, the server address, its port and the path of the current resource. In our example, the browser builds three URLs that are all identical: http://localhost:8080/public/image1_small.jpg. Note that a modern browser facing this situation will realize that one and the same resource is requested, and will send only one GET request to retrieve the image.

<!DOCTYPE html>
<html>
<body>
    <h1>Welcome</h1>
    <h2>Full URL</h2>
    <img src="http://localhost:8080/public/image1_small.jpg">
    <h2>Absolute URL</h2>
    <img src="/public/image1_small.jpg">
    <h2>Relative URL</h2>
    <img src="image1_small.jpg">
</body>
</html>
Code 5.7: An example of an HTML page containing full, absolute and relative URLs.
Finally, knowing the HTTP protocol helps you understand how web browsers behave when they receive responses from web servers. As mentioned at the beginning of this chapter, the HTTP protocol defines a status code that indicates in the response whether the processing requested by the request went well or not. A status code is a three-digit code (xxx). The hundreds digit expresses the meaning of the response. 2xx codes are success codes. A browser receiving such a response knows it will find the answer to its request in the response body. The best-known code is 200, which indicates complete success of the request. 3xx codes are redirection codes. A browser receiving such a response knows it must send new requests for its request to be processed. The best-known code is 302, which asks the browser to send a new request to a new URL given in the response header named Location. 4xx codes are client-side (web browser) error codes. The best-known code is 404, which tells the browser that the requested resource does not exist. Finally, 5xx codes are server-side error codes. Code 500 indicates an internal server error.
HTTP and the web server
Web servers must be able to process all the HTTP requests sent to them, whether GET or POST. They must be able to distinguish requests by type and URL. They must also be able to retrieve the information sent in requests, whether it is encoded in the URLs or in the body of the requests. Finally, they must send back the responses that correspond to the requests received.
Code 5.8 shows a server that processes POST and GET requests. This server reuses Code 4.1 of the static server. Lines 9 to 16 handle static resources. Compared with Code 4.1, line 9 adds a test to check that the request is a GET request. Lines 17 to 29 are completely new. They handle the form shown in Code 5.4. Line 17 checks that the request is a POST request and that the URL is /description-image. Lines 18 to 28 retrieve the data contained in the request body, add it to the descriptions array defined on line 7, and return a response with code 200 containing the array of descriptions as text.
const fs = require("fs");
const http = require("http");
const host = 'localhost';
const port = 8080;
const server = http.createServer();

const descriptions = [];
server.on("request", (req, res) => {
    if (req.method === 'GET' && req.url.startsWith('/public/')) {
        try {
            const fichier = fs.readFileSync('.'+req.url);
            res.end(fichier);
        } catch (err) {
            console.log(err);
            res.end("error: resource");
        }
    } else if (req.method === "POST" && req.url === "/description-image") {
        let donnees = "";
        req.on("data", (dataChunk) => {
            donnees += dataChunk.toString();
        });
        req.on("end", () => {
            const paramValeur = donnees.split("&");
            const imageNumber = paramValeur[0].split("=")[1];
            const description = paramValeur[1].split("=")[1];
            descriptions[imageNumber] = description;
            res.statusCode = 200;
            res.end(descriptions.toString());
        });
    }
    else {
        res.end("error: URL");
    }
});

server.listen(port, host, () => {
    console.log(`Server running at http://${host}:${port}/`);
});
Code 5.8: A server that processes a form.
This chapter presents the HTTP protocol. Remember three points:
- HTTP is a client-server and request-response protocol. The messages exchanged are text messages made up of three parts (command or status line, headers and body).
- The web browser initiates communication. It sends requests when the user uses the address bar, when it receives HTML code that references other resources, and when the user interacts through
<a>and<form>tags. - The web server receives the requests sent to it. It can distinguish requests by type and URL. It can retrieve the information encoded in the requests. Finally, it sends back responses, specifying the status code and the content of the response.
Practice
Review questions
HTTP is a client-server protocol because:
- a) Interactions take place between clients and servers.
- b) Interactions are always initiated by the client.
- c) Interactions are always initiated by the server.
HTTP is a request-response protocol because:
- a) There is exactly one response per request.
- b) There is one response for several requests.
- c) There are several responses for a single request.
In what form are HTTP requests encoded?
- a) Binary (a string of bytes).
- b) A JSON document (a tree with tags).
- c) Text (a string of characters).
To retrieve a web page, how many requests must the web browser send?
- a) One request per resource making up the web page.
- b) A single request for all the resources that make up the page.
- c) A single request; the server sends as many responses as there are resources.
Can the browser send information with a GET request?
- a) No, a POST request must be used.
- b) Yes, but only in the body of the GET request.
- c) Yes, but only in the URL of the request (in the path or the parameters).
Answers: 1-b, 2-a, 3-c, 4-a, 5-c
Exercise 1 - Login form
The goal is to create a web application that offers a simple login form.
Create a directory chap5-exercice1 in which you will create three files: server.js, index.html and login.html. The file server.js will contain the code of your web server. The file index.html will contain the code of the home page. The file login.html will contain the code of the login form.
Code the server server.js so that it delivers the page index.html and the page login.html.
Code the web page index.html so that it displays a link to the page login.html, which will be used to log in.
Code the web page login.html so that it displays a login form.
Code the submission of the login form. Assume that the server knows the login / password of several users (hard-coded in the server's code). If the submitted login/password is correct, the server returns a home page with a welcome message. Otherwise, it returns an error page.
Project - Image wall
We will continue our project that displays images (see Chapter 4, project).
We now want to let users add comments and likes to the images. You can see the expected result here.
Take the code you wrote in chapter 4 and copy it into a new directory named chap5-projet.
Create a new web page (image-description.html), served statically, containing an HTML form for entering a comment about an image. The form must contain the following fields:
- a field for entering the number of the image to comment on,
- a text field for the comment,
- a submit button.
The comment must be submitted using the HTTP POST method.
The target URL of the comment must be
/image-description.Make the web page
image-description.htmlreachable through a hyperlink on the image wall (at the top, before the images).Add a new route to the web server to handle POST requests on the URL
/image-description. This route must retrieve the values entered in the form and display them in the web server's console. Use the JS function console.log() to print to the console.It must also add the comment to an array of comments in the web server.
Finally, it must send back a dynamic page indicating that the comment has been added.
Modify the dynamic generation of the page of each image (/page-image/1, /page-image/2, etc.) so that the comments are displayed below the image on that page.
Rework your code so that the comment form is no longer served statically but is embedded dynamically in the page of each image. The goal is to be able to comment on an image while looking at it. You will need to modify the form, since the user should no longer have to enter the image id.
Modify the handling of a new comment submission so that the server sends the browser a redirect to the page that displays the image (instead of a page saying that the comment was added). The server must send back a response with status code 302 and specify the URL of the target page in the header. The following code shows an example of a redirect to the index page.
res.statusCode = 302;
res.setHeader('Location', '/index.html');
res.end();