Chapter 8 - Connecting the Server to the Database
A modern web application consists of a web server that responds to the requests sent by clients, and a database that helps the web server by storing useful information and making read and write access easier.
The web server and the database are therefore two separate components of the application. This chapter shows how to connect them and explains how they interact.
Connecting the server to the database
For simplicity, we consider a web application made up of a single web server and a single database (complex applications can consist of several servers and several databases). The web server and the database are connected, but it is important to understand that the web server initiates the connection. Indeed, the web server sends SQL queries to the database, which executes them and sends back the results. Thanks to the results sent by the database, the web server can then respond to the requests of web browsers and generate the web pages they expect to receive. In other words, the database waits for queries from the web server, which aim either to read data from the database or to write data to it.
SQL queries are sent from the web server to the database using a communication protocol. Unfortunately, there is no standard for this protocol, and each database offers its own. Fortunately, all databases provide drivers that handle the connection to the database and the sending of SQL queries, for virtually any programming language.
In this book, we chose to use the Postgres database and to write our server in JavaScript. Postgres is a widely used, open-source database available on all operating systems. To use Postgres in our application, we therefore need a JavaScript driver for Postgres. Several drivers can play this role. We chose the pg driver, which is one of the most popular (https://github.com/brianc/node-postgres).
To use the pg driver for JavaScript, you must download it and import it into the web server's code. The driver can be downloaded with npm, a package manager for JavaScript. Using npm requires initializing the project with the following command in your terminal:
npm init
The initialization asks several questions to fill in the project name, its author, its license, etc. Once the project is initialized, a file package.json is created, containing all the information about the project. You can then download the pg driver with the following command:
npm install pg --save
The pg driver is then downloaded and stored in the node_modules directory. It can now be used in the web server's code.
Code 8.1 shows how to create a connection to the Postgres database using the pg driver. The first line imports the pg driver into the web server's code. The import is done with the require function, a JavaScript function that imports modules. Here we extract from the module a class named Client, which will be used to create a connection to the database.
Lines 3 to 8 configure a connection to the database. The constructor (new) of the Client class takes as a parameter an object containing the information needed to connect to the database. In our case, we must provide the user name, the password, the name of the database and the port used by the database. This information depends on the context in which your application runs and must be adapted to the configuration of your database. In our case, we use a Postgres database installed locally on our machine. The user name is postgres, the password is root, the database name is application_image and the port used by the database is 5432 (the default port). Calling the constructor returns an object named client, which will be used to connect to the database.
Lines 10 to 17 set up the connection to the database. Calling the connect method on the client object connects to the database. Since this can take time, the method returns a JavaScript promise, an object with two functions, then and catch, whose callbacks run in case of success or failure respectively. In our case, we simply display a success or failure message. Note that in case of success, the client object can then be used to send queries to the database.
const { Client } = require('pg');

const client = new Client({
    user: 'postgres',
    password: 'root',
    database: 'application_image',
    port : 5432
});

client.connect()
.then(() => {
    console.log('Connected to database');
})
.catch((e) => {
    console.log('Error connecting to database');
    console.log(e);
});
Code 8.1: Connecting to the Postgres database.
Code 8.2 shows an example of an SQL query sent to the database.
The query is sent with the query method of the client object.
This method takes as a parameter a character string containing the SQL query to execute.
In our example, we send the query SELECT * FROM images, which retrieves all the images in the table.
client.query('SELECT * FROM images')
.then((res) => {
    console.log(res.rows);
})
.catch((e) => {
    console.log('Error executing query');
    console.log(e);
});
Code 8.2: Sending a query to the Postgres database.
The query method also returns a promise. If the query succeeds, the then callback is executed. It takes as a parameter an object (res) containing the result of the query. This object is complex because it has several properties. One of them, the rows property, is an array representing the rows of the result table. Code 8.3 shows an example illustrating the structure of the res object. You can see that this object has a rows property, which is an array of objects representing the rows of the result table. This example also shows (last line) how to access a particular value of the result (here, the file name of the second image).
// result obtained after client.query('SELECT * FROM images')
// assume the query returns three images
let res = {
    rows : [
        {
            id: 1,
            nom:"Portrait Bleu",
            fichier: "Image1.jpg"
        },
        {
            id: 2,
            nom:"Marcheur",
            fichier: "Image2.jpg"
        },
        {
            id: 3,
            nom:"Sol Rouge",
            fichier: "Image3.jpg"
        }
    ]
};
let nomFichierDeuxiemeImage = res.rows[1].fichier;
Code 8.3: Structure of the object returned by the execution of a query.
Code 8.4 shows the same query as Code 8.2, but uses the await mechanism offered by JavaScript to make promises easier to handle. This keyword tells the JavaScript engine to wait until the called function has finished before continuing. The JavaScript code thus reads as if it were executed synchronously. This makes the code simpler to write and understand. Note, however, that await must be used in an explicitly asynchronous context (the async keyword must appear in the code), which our example does not show. Line 25 of the web server code shows how to declare an asynchronous context (the async keyword appears in the signature of the function containing the code that uses await).
let res = await client.query('SELECT * FROM images') // The next line runs once the query has finished
console.log(res.rows);
Code 8.4: Sending queries to the Postgres database using await.
Web applications and reading data
We illustrate the connection between a web server and a database with our image management application. The database of this application is named application_image and contains the images table, which stores information about the images (their name, nom, and their file, fichier). Table 8.1 shows the content of the images table.
| id | nom | fichier |
|---|---|---|
| 1 | Portrait Bleu | Image1.jpg |
| 2 | Marcheur | Image2.jpg |
| 3 | Sol Rouge | Image3.jpg |
| 4 | Bulles chaudes | Image4.jpg |
| 5 | Nature morte | Image5.jpg |
| 6 | Grotte vivante | Image6.jpg |
| 7 | Travail Soir | Image7.jpg |
| 8 | Citron Salade | Image8.jpg |
| 9 | Flou artistique | Image9.jpg |
Table 8.1: Table of images used as an example to illustrate the connection between a web server and a database.
Code 8.5 shows the code of the web server that displays the image wall by reading the table of images. Lines 1 to 3 import the modules needed by the web server. Lines 5 to 7 create the web server. Lines 9 to 23 create a connection to the database. Lines 25 to 65 handle the requests received by the web server. Lines 26 to 38 handle requests for static resources (HTML, CSS and JS files, images, etc.).
We are particularly interested in lines 38 to 61, which handle the display of the image wall.
The goal is to create an HTML page containing as many <img> tags as there are images in the database.
To do this, a query must first be sent to the database to retrieve the files of the images.
The SQL query is embedded in the JS code as a character string (line 40).
Line 41 executes the query and stores the result in the sqlResult object.
Then all the rows of this result must be traversed to retrieve the image files (line 42).
Here we use the map function on the rows field of the sqlResult object, which traverses all the rows of the result and returns an array containing only the image files.
The variable fichiersImage therefore contains an array of character strings corresponding to the image files.
This array is used in the rest of the code to generate the <img> tags (for loop on lines 49 to 53).
The HTML page generated and returned to the browser (line 56) therefore contains as many <img> tags as there are images in the database.
const fs = require("fs");
const http = require("http");
const { Client } = require('pg');

const host = 'localhost';
const port = 8080;
const server = http.createServer();

const client = new Client({
    user: 'postgres',
    password: 'root',
    database: 'application_image',
    port : 5432
});

client.connect()
.then(() => {
    console.log('Connected to database');
})
.catch((e) => {
    console.log('Error connecting to database');
    console.log(e);
});

server.on("request", async (req, res) => {
    if (req.url.startsWith('/public/')) {
        try {
            const ressource = fs.readFileSync("./" + req.url);
            res.end(ressource);
        } catch (error) {
            let html = '<html><body><h1>404 Error</h1>';
            html += '<p>Page not found</p>';
            html += '<a href="/">Back to the home page</a>';
            html += '</body></html>';
            res.statusCode = 404;
            res.end(html);
        }
    } else if (req.url === '/mur-images') {
        try {
            const sqlQuery = 'SELECT fichier from images';
            const sqlResult = await client.query(sqlQuery);
            const fichiersImage = sqlResult.rows.map(row => row.fichier);

            let pageHTML = "<!DOCTYPE html><html>"
            pageHTML += '<head></head>';
            pageHTML += '<body>';
            pageHTML += '<h1>Image wall</h1>';
            pageHTML += '<div id="mur-images">';
            for (let i = 0 ; i < fichiersImage.length ; i++) {
                const fichierSmallImage = fichiersImage[i].split('.')[0] + '_small.jpg';
                const img = '<img src="/public/'+fichierSmallImage+'" />';
                pageHTML += '<a href="/image/'+(i+1)+'" >' + img + '</a>';
            }
            pageHTML += '</div>';
            pageHTML += "</body></html>";
            res.end(pageHTML);
        } catch (e) {
            console.log(e);
            res.end(String(e));
        }
    } else {
        const index = fs.readFileSync("./public/index.html", "utf-8");
        res.end(index);
    }
})

server.listen(port, host, () => {
    console.log(`Server running at http://${host}:${port}/`);
});
Code 8.5: Server connected to the database, displaying the image wall.
The server code we have just presented displays the image wall after reading the information stored in the database (see Figure 8.1).
In our example, the table of images contains nine images.
The image wall page therefore contains nine <img> tags that display the nine images.
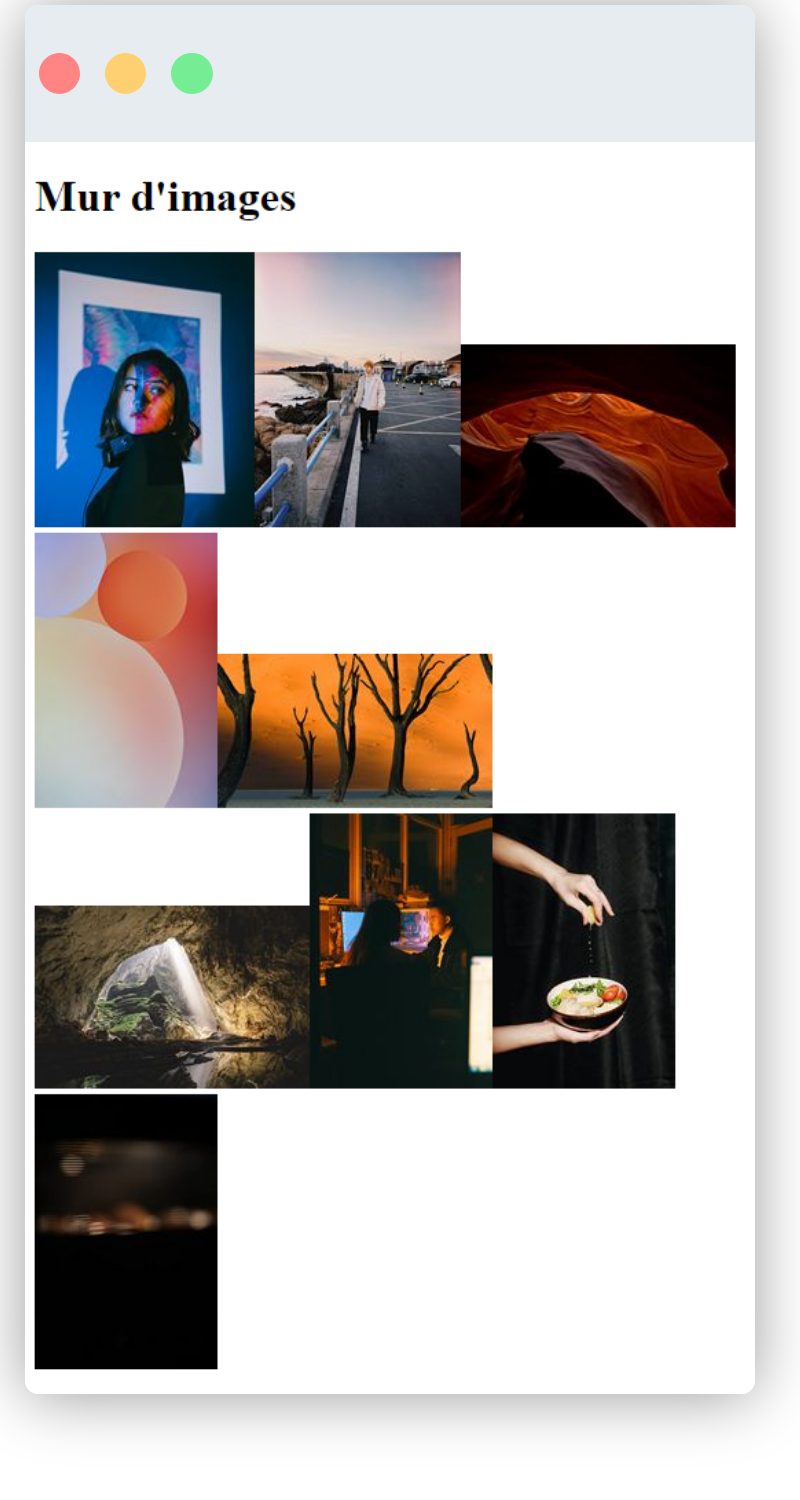
Figure 8.1: The image wall built from the information stored in the database.
With this first example, we illustrate how handling browser requests, generating HTML pages and interacting with the database fit together. You can see in the code that we chose to connect to the database when the server starts. Then, we send a query to the database every time the server receives a request to display the image wall. This choice is discussed later in this chapter, where we will see how to improve the server's performance.
Web applications and writing data
To illustrate the connection between a web server and a database in write mode, we consider the commentaires (comments) table, which lets users add comments to images. This table has three columns: the id of the comment, the text of the comment (texte) and a reference to the id of the commented image (id_image). Table 8.2 shows the content of this table with three comments, two of which are about image 1.
| id | texte | id_image |
|---|---|---|
| 1 | Very nice | 1 |
| 2 | I really like it | 2 |
| 3 | Beautiful colors | 1 |
Table 8.2: The comments table used as an example to illustrate the connection between a web server and a database in write mode.
Code 8.6 shows the code of the server that displays the comment form and adds the comment to the database.
We are interested in lines 25 to 66, which handle the display of the form (via the GET request) and its submission (via the POST request).
Line 50 builds the SQL query that adds a comment to the database.
This query is built from the information contained in the body of the POST request sent by the browser.
You can see that this query is built simply by concatenating character strings (`INSERT INTO commentaires (texte, id_image) VALUES ('${texte}', ${id_image});`).
As soon as this query has been executed (line 51), the server sends the browser a response informing it that the comment has been added to the database.
Unlike the previous example, we do not use the value returned by the SQL query.
Indeed, in case of an error, the code in the catch block is executed.
const fs = require("fs");
const http = require("http");
const { Client } = require('pg');

const host = 'localhost';
const port = 8080;
const server = http.createServer();

const client = new Client({
    user: 'postgres',
    password: 'root',
    database: 'application_image',
    port : 5432
});

client.connect()
.then(() => {
    console.log('Connected to database');
})
.catch((e) => {
    console.log('Error connecting to database');
    console.log(e);
});

server.on("request", async (req, res) => {
    if (req.url === '/commentaires') {
        if (req.method === 'GET') {
            let pageHTML = "<!DOCTYPE html><html>"
            pageHTML += `<head></head>`;
            pageHTML += "<body>";
            pageHTML += '<h1>Comment on an image</h1>';
            pageHTML += '<form method="POST" action="/commentaires">';
            pageHTML += '<label>text</label>';
            pageHTML += '<input type="text" name="texte" />';
            pageHTML += '<label>id_image</label>';
            pageHTML += '<input type="text" name="id_image" />';
            pageHTML += '<input type="submit" value="Send" />';
            pageHTML += '</form>';
            pageHTML += "</body></html>";
            res.end(pageHTML);
        } else {
            let data = '';
            req.on('data', (chunk) => {
                data += chunk.toString();
            });
            req.on('end', async () => {
                const texte = data.split('&')[0].split('=')[1];
                const id_image = data.split('&')[1].split('=')[1];
                try {
                    const sqlQuery = `INSERT INTO commentaires (texte, id_image) VALUES ('${texte}', ${id_image});`;
                    await client.query(sqlQuery);

                    let pageHTML = "<!DOCTYPE html><html>"
                    pageHTML += '<head></head>';
                    pageHTML += '<body>';
                    pageHTML += '<h1>Comment</h1>';
                    pageHTML += '<div >';
                    pageHTML += '<p>OK, the comment is in the database</p>';
                    pageHTML += '</div>';
                    pageHTML += "</body></html>";
                    res.end(pageHTML);
                } catch (e) {
                    console.log(e);
                    res.end(String(e));
                }
            });
        }
    } else {
        const index = fs.readFileSync("./public/index.html", "utf-8");
        res.end(index);
    }
})

server.listen(port, host, () => {
    console.log(`Server running at http://${host}:${port}/`);
});
Code 8.6: Server connected to the database, adding a comment.
The server code we have just presented displays the comment form and adds the comment to the database after reading the information contained in the body of the POST request sent by the browser. You can see that the server code is very similar to the one presented in the previous section. Here again, the server builds the SQL query and uses the driver (variable client) to execute it.
Figure 8.2 shows the comment form, in which we have already entered the text of the comment and the number of the target image. Clicking on the submit button sends the POST request to the server, and therefore executes the SQL query that adds the comment to the database.
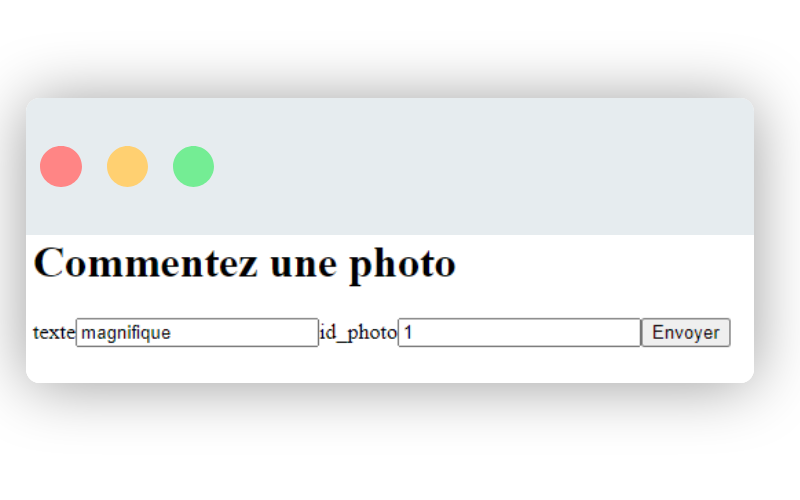
Figure 8.2: The form for adding a comment to an image.
We have just presented a second way of combining the handling of browser requests, the generation of HTML pages and interactions with the database. It is very similar to the one presented in the previous section, but it illustrates that the server can also be used to modify the content of the database. Here, the server necessarily sends a query to the database each time it receives a comment submission, since each of these requests must modify the content of the database.
client.query('INSERT INTO commentaires (texte, id_image) VALUES ($1, $2)', [texte, id_image]). The driver then sends the values separately from the query, and they can never be interpreted as SQL code.
Performance of web applications
In the previous sections, we presented how web servers connect to a database and how they send read and write queries. The code we presented makes two choices that can affect the performance of web applications.
The first choice concerns the connection to the database. In the code we presented, the server connects to the database as soon as it starts. It is even the first thing it does, before listening for requests sent by browsers. This choice has the advantage of simplifying the server's code, because the connection to the database is made once and never questioned again. The drawback is that the server is permanently connected to the database, even when it receives no requests. Another drawback is that the server cannot reconnect to the database if the connection is lost (if the database is restarted, for example). Another possible choice is to connect to the database every time the server receives a request. Code 8.7 shows how to code this alternative. In this example, you can see that the connection to the database is made in the code that handles the GET request displaying the image wall. The drawback of this alternative is that connecting to a database takes time, so the server must wait for the connection to be established before it can respond to the request. Another drawback is that the database may receive several connection requests at the same time if the server receives several requests at once, which may disrupt it (a database usually accepts a limited number of parallel connections). A common compromise, which we do not detail here, is a connection pool: a set of connections opened in advance and reused from one request to the next (the pg driver offers one through its Pool class).
server.on("request", async (req, res) => {
    if (req.url === '/mur-images') {
        try {
            const client = new Client({
                user: 'postgres',
                password: 'root',
                database: 'application_image',
                port : 5432
            });

            await client.connect();

            const sqlQuery = 'SELECT fichier from images';
            const sqlResult = await client.query(sqlQuery);
            const fichiersImage = sqlResult.rows.map(row => row.fichier);
            await client.end(); // close the connection

            let pageHTML = "<!DOCTYPE html><html>"
            pageHTML += `<head></head>`;
            pageHTML += "<body>";
            pageHTML += '<h1>Image wall</h1>';
            pageHTML += '<div id="mur-images">';
            for (let i = 0 ; i < fichiersImage.length ; i++) {
                const fichierSmallImage = fichiersImage[i].split('.')[0] + '_small.jpg';
                const img = '<img src="/public/'+fichierSmallImage+'" />';
                pageHTML += '<a href="/image/'+(i+1)+'" >' + img + '</a>';
            }
            pageHTML += '</div>';
            pageHTML += '<script src="/public/mur.js"></script>';
            pageHTML += "</body></html>";
            res.end(pageHTML);
        } catch (e) {
            console.log(e);
            res.end(String(e));
        }
    }
})
Code 8.7: Server that connects to the database for every request sent by the browser.
The second choice made in the code of the previous sections concerns how the server sends queries to the database. We chose to send a query to the database every time the server receives a request from the browser. While this is absolutely necessary for write queries, it is not necessary for read queries. Indeed, if the requests sent by browsers are the same, it is possible to send a single read query to the database and store the result in a variable (a cache). Subsequent requests will then not need to query the database and can directly use the result stored in the cache. Coding such a mechanism is much more complicated, because it requires remembering the requests already sent by browsers and the corresponding results. It also requires a mechanism to update the cache when the database is modified.
This chapter presents how to connect a database to a web server. Remember the following three points:
- Each database offers its own communication protocol. You must therefore use a driver that implements this protocol in a programming language to communicate easily with the database. In our context, we chose the JavaScript driver pg, which communicates with a PostgreSQL database.
- The connection to the database and the interactions with it are handled by the server. The server starts by creating a connection to the database. Then, every time it receives a request from the browser, it sends a query to the database and uses the result to respond to the browser's request.
- Several choices are possible for managing the connection to the database and the queries sent to it. These choices can affect the performance of web applications.
Practice
Review questions
Must the database run on the same computer as the web server?
- a) Yes, otherwise the web server cannot access the data.
- b) No, but the web server must be able to access the database files.
- c) No, the database offers a protocol so that any other program (including the web server) can use its services.
Are all databases accessible over HTTP?
- a) No, each database offers its own communication protocol.
- b) No, you must use DBTP (Data Base Transfer Protocol).
- c) Yes, you just send GET requests with the SQL queries in the URL.
What is a database driver?
- a) A program that lets the database read and write files on the hard drive.
- b) A program that gives access to a database from a particular programming language (for example, there is a JavaScript driver for the Postgres database).
- c) A program that lets the database send requests to the web server.
With the pg driver (the JavaScript driver for Postgres), must a connection to the database be created before sending queries?
- a) No, the driver offers the execQuery() function, which executes queries directly.
- b) Yes, but only if you want to send several queries.
- c) Yes, a connection is created with an object of the Client class, which offers methods to execute queries.
With the pg driver (the JavaScript driver for Postgres), how are the results of a query presented?
- a) As a complex object with a property named 'rows' that contains the results.
- b) As a character string encoded like a URL with parameters.
- c) Encoded in binary to optimize communication between the database and the client.
Answers: 1-c, 2-a, 3-b, 4-c, 5-a
Exercise 1 - Sports competitions
We will reuse the sports competition concepts introduced in exercise 1 of chapter 7 (see Chapter 7 - exercise 1).
Download competitions-sportives.sql and initialize the competitions_sportives database (note that this script is not a solution to exercise 1 of chapter 6).
Create a directory named chap8-ex1.
In the chap8-ex1 directory, run the command
npm initto initialize the JavaScript configuration. Answer yes to all the questions.Run the command
npm i pg --saveto download and install the pg driver.Still in the chap8-ex1 directory, add the file server.js, which will contain your web server.
Code the web server so that it connects to the database. Make sure to put the name of the database (competitions_sportives) in the connection options. Display a message in the console as soon as the connection between the web server and the database is up.
In the web server, add a GET route on /joueurs that returns a web page listing all the players (joueurs) stored in the database. Test your web server by requesting the URL: http://localhost:8080/joueurs.
Modify your code so that the GET URL /joueurs returns the list of players with their category.
Create a form to add a player to the database and handle the form submission in the web server. Make sure the form offers a drop-down list (
<select>tag) for choosing the player's category (this list must be filled from the categories table of the database). Test your form by adding a player and checking that they have been added by requesting the URL: http://localhost:8080/joueurs.
Project - Image wall
We will continue our project that displays images (see Chapter 7, project).
The goal is to connect our server to the database. While the image files remain stored on the hard drive, the information about the images is stored in the database.
You can see the expected result here.
Take the code you wrote in chapter 7 and copy it into a new directory named chap8-projet.
Run the script application-image.sql to initialize the data of your database. You should get a database named application_image.
Initialize your project with npm (run the commands
npm initandnpm i pg --save).Modify your code so that the page index.html is generated dynamically and the three images it displays are the most recent ones, based on the date property stored in the images table of the database. Check that clicking on one of these three images leads to the page of the corresponding image.
Modify your code so that the image wall page is generated from the information stored in the database.
Modify your code so that the generation of the image pages uses the information stored in the database. Make sure to include the title of the image in the page and to display the comments stored in the database. Submitting a new comment must also update the database.