Chapter 2 - HTML and Web Pages
The purpose of a web page is to be displayed in a web browser so that users can view it and interact with it. A web page is made up of several resources. Some contribute to the visual appearance of the page, such as the HTML code, CSS style sheets and media, while others, such as JavaScript code, define the ways of interacting with it.
This chapter presents the HTML language. It covers the basics of this language and introduces several tags needed to build basic web pages.
Web pages and HTML
The essential resource of a web page is its HTML code. Each web page contains a single HTML code, which forms its skeleton and defines its structure. It is common to confuse a web page with its HTML code. However, to be more precise, we will distinguish these two concepts: a web page includes the HTML code as well as other resources such as CSS style sheets, media, JavaScript code, and so on.
To view a web page, a user uses their web browser to send a request to the URL of the page's HTML code. The browser then receives the page's HTML code as text, written in the HTML language. It analyzes this HTML code to see whether there are other resources to retrieve, then to obtain the structure of the web page and know how to display it on a screen.
Prologue and HTML tags
The HTML code of a web page starts with a first line that specifies the document type and the HTML version used. This first line is called the prologue. For simplicity, we consider that the prologue is defined by the line <!DOCTYPE html>. This prologue indicates that the web page follows the HTML5 standard.
After the prologue, the rest of the HTML code of a web page is structured as a tree of HTML tags, which can contain unstructured text. The HTML standard defines many tags (around a hundred), each with its own semantics. The tree of HTML tags is called the DOM (Document Object Model). It provides a structured representation of the HTML document and defines how programs can manipulate it (see Chapter 9).
HTML uses specific text markers to identify opening and closing tags and to express tree relationships (children / siblings). An opening tag is written as the tag name surrounded by angle brackets ("<" and ">"). For example, the text <body> represents the opening body tag. Some tags can have parameters. These must be declared in the opening tag, right after the tag name. Thus, <a href="page2"> is the opening a tag with the parameter href, whose value is page2 (we will explain the meaning of this tag later in this chapter). A closing tag is written almost the same way as an opening tag, except for the "/" character right after the first angle bracket. For example, </body> is the closing body tag. Note that some tags never contain other tags or even text, and therefore do not need a closing tag (this is the case of the <img> tag, which we describe later in the chapter).
As for the tree structure, everything located between an opening and a closing tag is considered a "child" of the tag. Two pairs of opening and closing tags are considered "siblings" if they share the same parent tag. For example, <html><body><span>Hello</span><span> everyone </span></body></html> gives the tree in Figure 2.1.
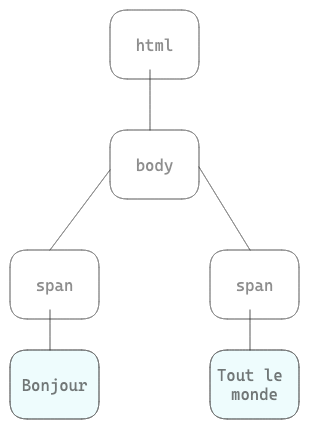
Figure 2.1: An example of an HTML tree (the DOM).
This system of opening and closing tags can be compared to parentheses: an opening tag opens a parenthesis and starts a subtree, while a closing tag closes the parenthesis and the subtree.
Basic structure and common tags
The HTML code of a web page contains a single tag at the root of its tree: the <html> tag. This tag can contain parameters, for example to indicate the language used by the web page. Thus <html lang="en"> specifies that the HTML code contains English text.
The <html> tag contains two children: the <head> tag and the <body> tag.
The <head> tag contains all the general information about the web page (the page's metadata). Inside the <head> tag, you can add the <title> tag, which specifies the title of the web page (this title is displayed in the browser tab). The <head> tag can contain other tags that reference the other resources of the web page (we present this later in this chapter).
The <body> tag defines the body of the web page. Everything contained in the <body> tag is meant to be displayed by the browser.
Code 2.1 shows a simple web page. The first line contains the prologue. Next, the <html> tag is the root tag. This tag contains two tags: <head> and <body>. The <head> tag contains the <title> tag, which specifies the title of the page. The <body> tag contains no tags, just plain text that will be displayed by the browser.
<!DOCTYPE html>
<html lang="en">
    <head>
        <title>Small page</title>
    </head>
    <body>
        A small web page
    </body>
</html>
Code 2.1: HTML code of a small web page.
Popular HTML tags
The HTML standard defines more than a hundred tags. Below, we have selected those commonly used when designing web pages.
The basic tags are used to build the structure of a web page:
<html>: the<html>tag is the root of the tag tree in HTML code.<head>: the<head>tag must be under the<html>tag. It contains general information about the web page as well as links to the resources that make it up.<title>: the<title>tag defines the title of the web page.<body>: the<body>tag must be under the<html>tag. It defines the body of the web page (what is displayed by the browser).
The following text tags are used to define the textual content of a web page:
<h1> ... <h6>: the<h1> ... <h6>tags define levels of text headings (<h1>being the highest level).<p>: the<p>tag defines a paragraph of text.<br>: the<br>tag adds a line break.<hr>: the<hr>tag adds a gray line to separate two sections of the page.<ul>: the<ul>tag defines an unordered list.<ol>: the<ol>tag defines an ordered list.<li>: the<li>tag defines an item in a list (list item), whether the list is ordered or unordered.
Media tags are used to embed images, videos or sound tracks:
<img (src width height)>: the<img>tag displays an image. The URL of the image must be given in the tag's src attribute. The width and height attributes change the display size.<audio (controls)>: the<audio>tag is used to play a sound. The controls attribute is optional. When it is used, the browser displays control buttons to play the sound (play, stop, etc.). The<audio>tag must contain a<source (src)>tag to target the sound content. The<source>tag specifies the URL of the sound content in its src attribute.<video (width height controls)>: the<video>tag is used to display a video. This tag must contain a<source (src)>tag to target the video content.
Structuring tags let you change the structure of the HTML tree and thus make it easier to lay out the web page:
<div>: the<div>tag defines a part of the web page. This tag is often used to structure the web page into different parts.<span>: the<span>tag defines a sub-part of a sequence of elements displayed inline. This tag is often used to structure the lines of the web page.
Finally, link tags connect the HTML code with the other resources that make up the web page:
<a (href)>: the<a>tag defines a link to a web page whose URL is given in the href attribute.<style>: the<style>tag defines a CSS style to apply to the web page (see Chapter 3).<link (href rel)>: the<link>tag references a resource whose URL is given in the href attribute; the nature of this resource's relationship with the web page is specified by the rel attribute. We explain how this tag is used to reference CSS styles in Chapter 3.<script (src)>: the<script>tag defines a script (JavaScript). It is also possible to reference an external script by giving its URL in the src attribute. We present this tag in Chapter 9.
Code 2.2 gives an overview of a typical web page. This example highlights the use of some of the tags introduced above. The page is structured in three parts (header, main and footer). The header uses a list to reference other pages (the home page, the images page and the albums page). The main part contains a heading, an image and a paragraph. The footer mentions the year the site was created.
<!DOCTYPE html>
<html lang="en">
    <head>
        <title>Page illustrating HTML tags</title>
    </head>
    <body>
        <header>
            <ul>
                <li><a href="home">Home</a></li>
                <li><a href="images">Images</a></li>
                <li><a href="albums">Albums</a></li>
            </ul>
        </header>
        <main>
            <h1>Image wall</h1>
            <img src="image-principale" width="200">
            <p>We built this application for <b>you</b></p>
        </main>
        <footer>
            Site built in 2022
        </footer>
    </body>
</html>
Code 2.2: Example of a web page.
Figure 2.2 shows the page of Code 2.2.
Displaying a web page
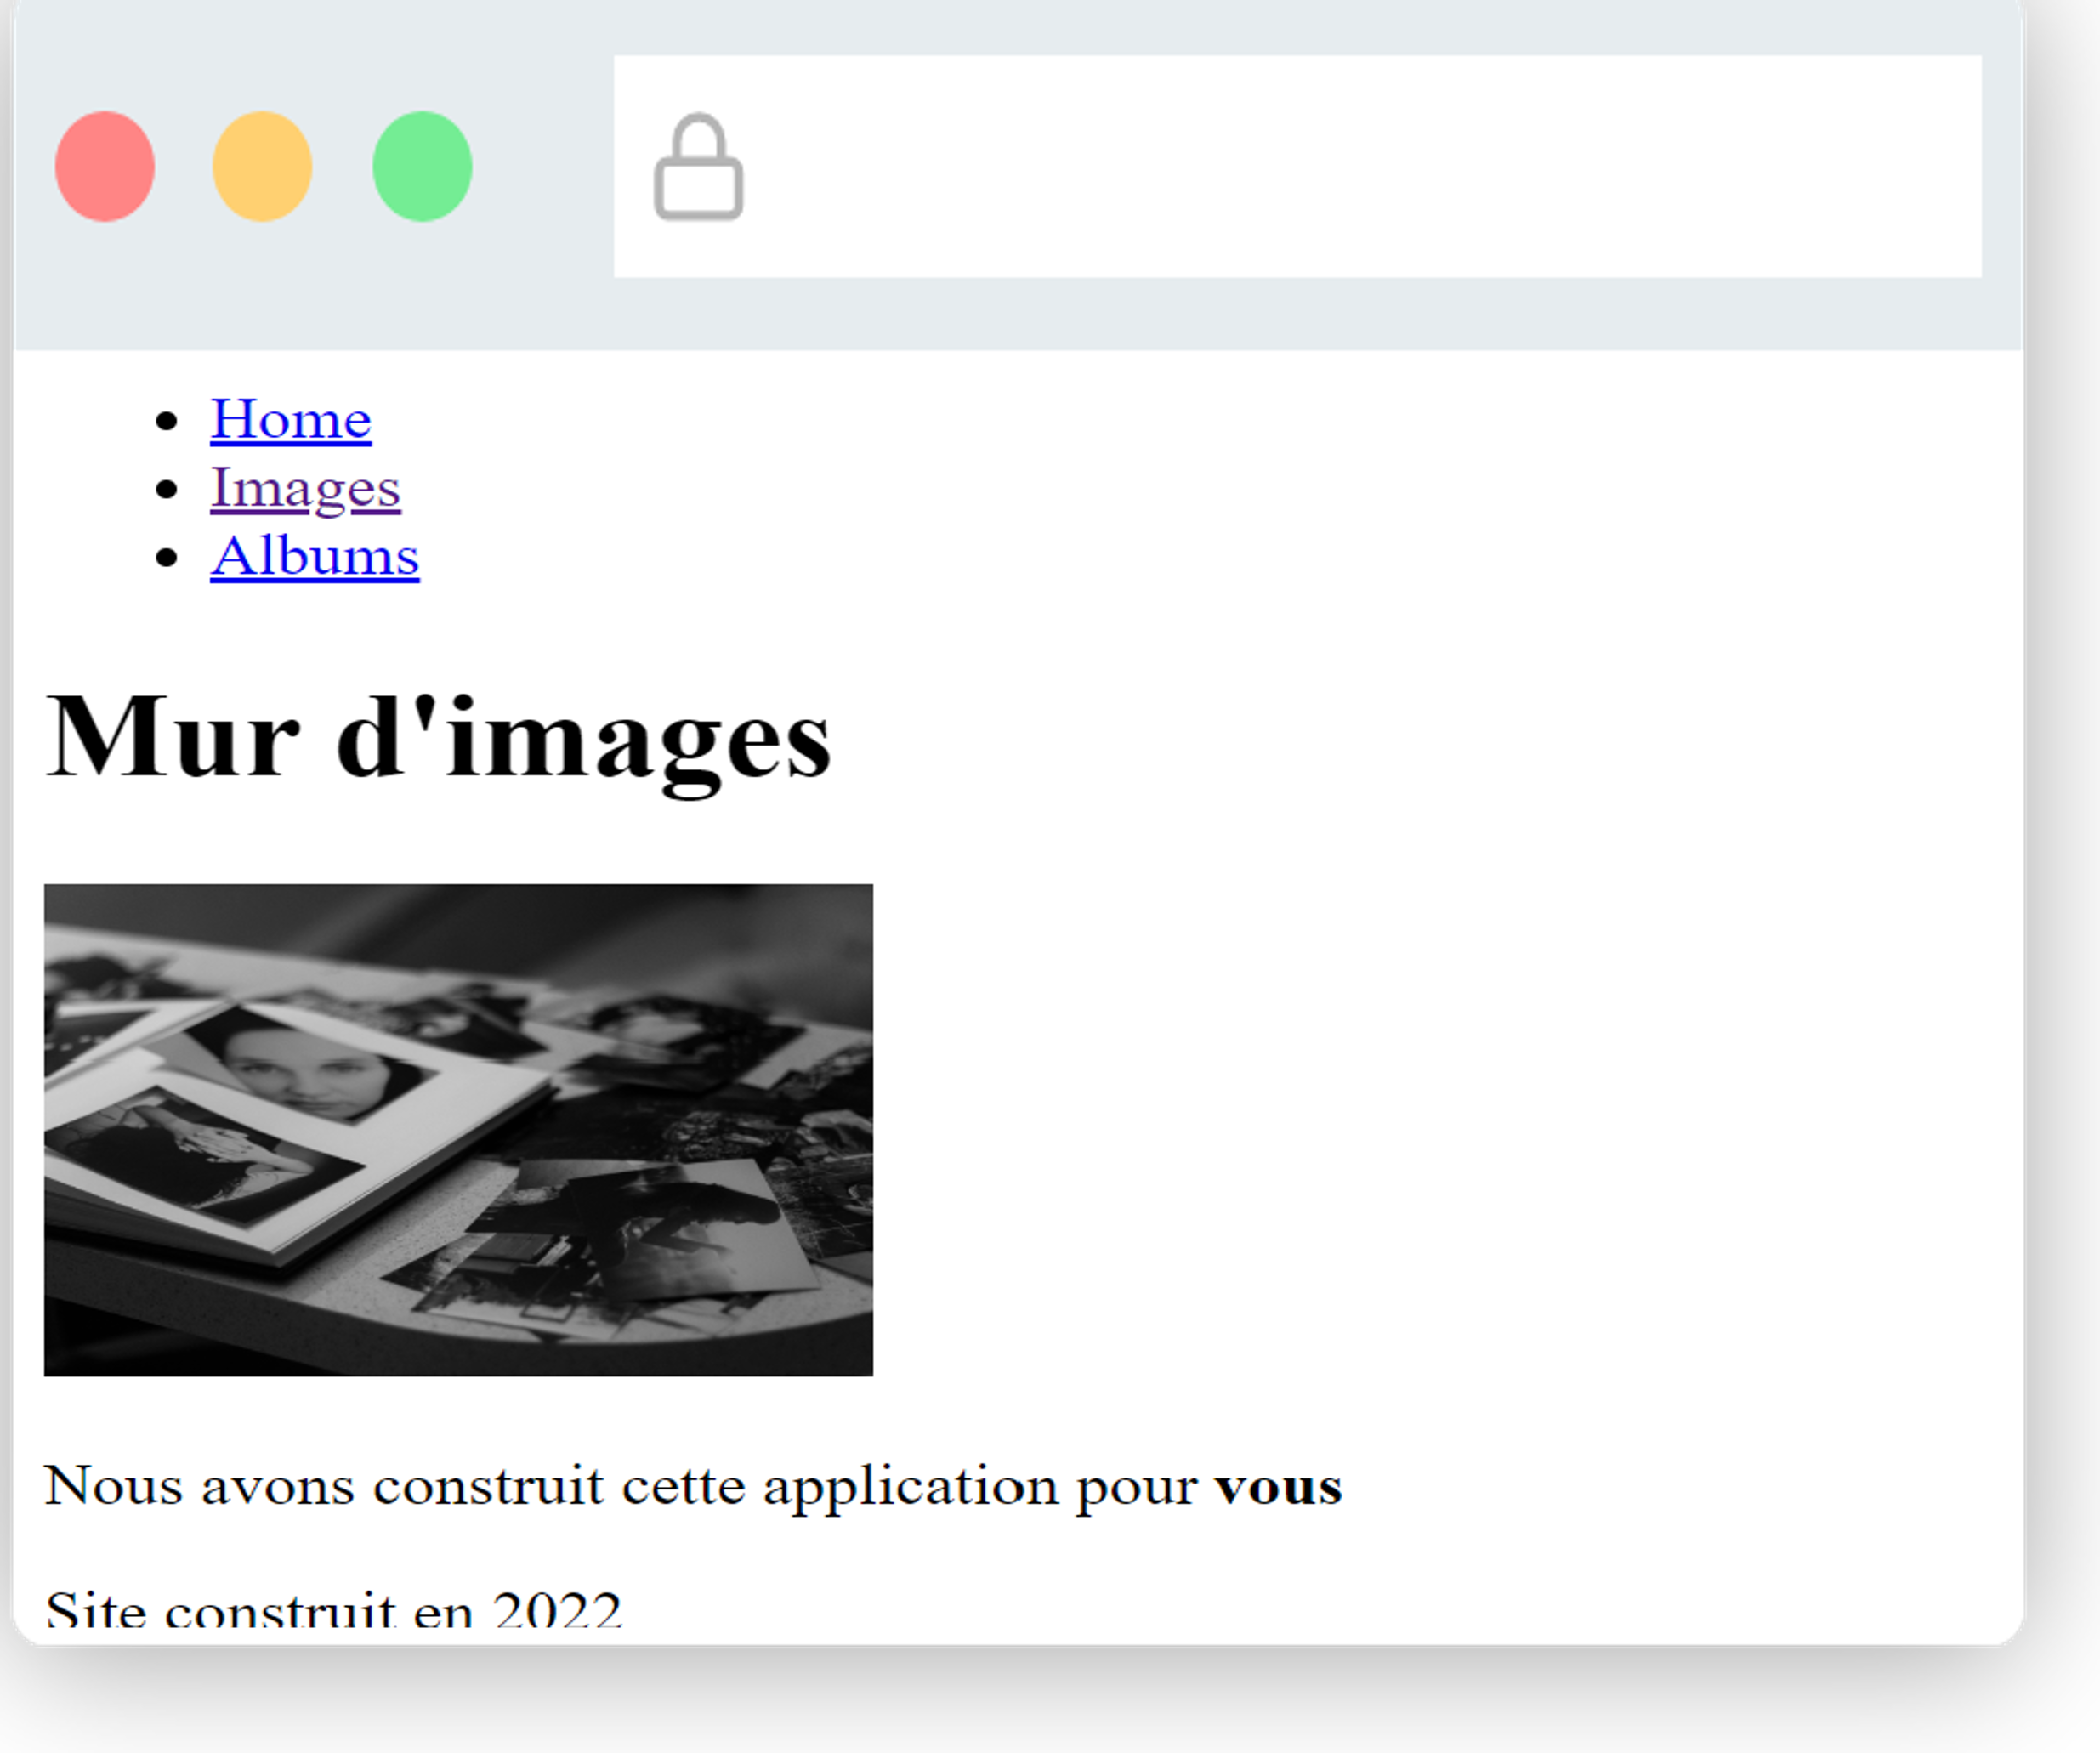
Figure 2.2: The web page whose code is given in Code 2.2.
Displaying a web page on the screen (painting) is done by the browser. It happens in two steps:
- Building the tag tree from the HTML code (turning text into a tree).
- Building an image from the tag tree (from the tree to the image).
We will illustrate these two steps using the following HTML code as an example:
<!DOCTYPE html>
<html lang="en">
    <head>
        <title>Small web page</title>
    </head>
    <body>
        <h1>My web page </h1>

        Hello,               this is the only page I have!


        <a href="page2">Click here to

            display page 2</a>


        <div> 2022 </div>

    </body>
</html>
Code 2.3: An example web page to illustrate how the browser displays it.
The first step (from text to tree) is fairly simple and consists of identifying the opening and closing tags in the HTML code. Note that building the tree involves a formatting mechanism for spaces, tabs and line breaks. All superfluous characters disappear when the tree is created (superfluous meaning all spaces before and after the text, double spaces, sequences of tabs, etc.). This formatting process means that adding spaces and/or line breaks to the HTML code does not affect how an HTML page is displayed.
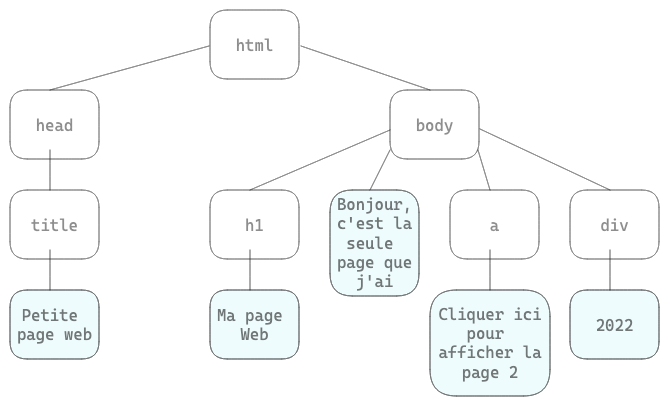
Figure 2.3: The tag tree of the HTML code in Code 2.3.
Figure 2.3 represents the tree of the example HTML code (see Code 2.3). The tree contains twelve nodes (for readability, text nodes are shown in blue). You can see that spaces, tabs and line breaks have been cleaned up: they no longer appear in the tree and have been trimmed inside the text nodes.
The goal of the second step is to build an image from the tag tree. In fact, only the subtree whose root is the <body> tag is considered when displaying the web page. The browser starts building the image by allocating a box to each node of the tree and positioning each box on the image relative to the others. Two basic principles govern how the boxes are built.
| positioning mode | tags that have this positioning mode by default |
|---|---|
| block | div, footer, form, h1 ...h6, header, hr, li, main, ol, p, table, ul, video |
| inline | a, b, br, button, em, i, img, input, span, plain text |
Table 2.1: HTML tags and their positioning mode.
Going back to our example, the first principle tells us that the box allocated to the body tag encloses the boxes allocated to the h1 tag, to the text ("Hello, ..."), and to the a and div tags. It also tells us that the box allocated to the h1 tag encloses the box allocated to its text ("My web page"), and likewise for the a and div tags. The second principle lets us lay out the boxes allocated to the children of the body tag. The h1 and div tags are positioned in block mode, that is, one above the other. This means their boxes each take up an entire line. For the a tag, inline mode is used, so the boxes are placed next to each other.
Figure 2.4 illustrates these boxes and their positioning.
Once the boxes are built and positioned, the browser displays the content (text, images, etc.). It then applies one last principle: give the content the smallest space necessary to display it. This produces the display in Figure 2.5.
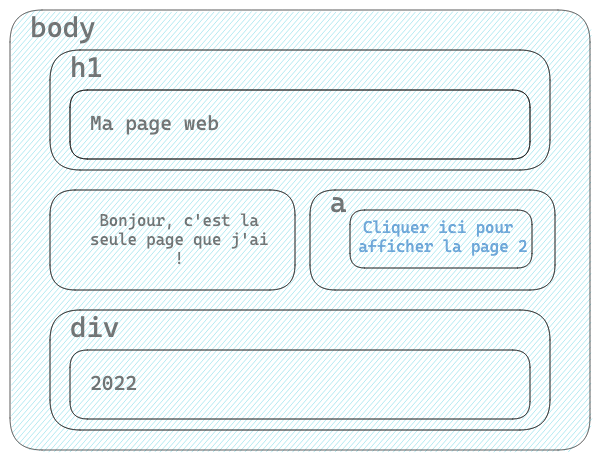
Figure 2.4: The boxes allocated to the tags of the HTML code in Code 2.3.
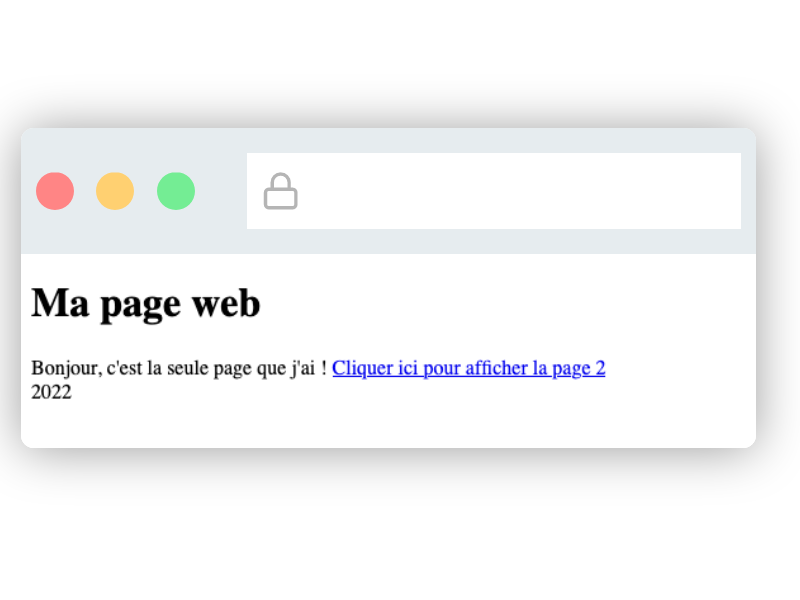
Figure 2.5: The display of the page whose HTML code is shown in Code 2.3.
This chapter introduces the fundamental concepts of the HTML standard. Remember three things:
- It is essential to understand that the HTML code is the main resource of a web page. A web page has a single HTML code. This HTML code defines the structure of the web page.
- HTML code is text that starts with a prologue and contains a tree of tags (the DOM). The HTML standard defines about 100 tags, each with its own semantics.
- An HTML page is displayed in two steps. The first step is building the tag tree from the HTML code. This step removes unnecessary spaces, tabs and line breaks. The second step consists of placing the HTML tags in boxes according to two positioning principles (1 - the parent's box contains the children's boxes, 2 - the boxes of sibling elements are either placed inline or stacked one above the other, depending on the tags).
Practice
Review questions
What is a web page?
- a) An HTML file that can be opened in a browser.
- b) A file delivered by a web server.
- c) A document made up of several resources delivered by web servers and meant to be displayed by a web browser. One of the resources making up a web page must be an HTML document.
What is the format of an HTML document?
- a) An HTML document is encoded in a binary format with all resources embedded.
- b) An HTML document is a zip file containing all the resources.
- c) An HTML document is text whose first line specifies the HTML version and whose other lines define the content, structured as a tree of tags.
What is an HTML tag?
- a) A text element identified by a name, which can be opening or closing. A tag starts with the character
<and ends with the character>. Closing tags have/as their second character. - b) A piece of HTML code.
- c) A subtree of the HTML document.
- a) A text element identified by a name, which can be opening or closing. A tag starts with the character
What is tree construction in HTML?
- a) The way spaces are removed from HTML documents.
- b) Building a tree that reflects the tag structure of an HTML document.
- c) Displaying an HTML document in the browser.
What is painting?
- a) The way the tag tree is built from the HTML document.
- b) The way HTML text is displayed.
- c) The way the HTML document is displayed from the tag tree.
Answers: 1-c, 2-c, 3-a, 4-b, 5-c
Exercise 1 - DOM tree
Here is the HTML code of a small web page.
<!DOCTYPE html>
<html>
    <head>
        <title>Page title</title>
    </head>
    <body>
        <h1>Page title</h1>
        <p>Page content</p>
    </body>
</html>
Draw the tree corresponding to the HTML code of this web page (the body tag is the root of the DOM tree).
Draw the rendering of this web page, showing the boxes.
Exercise 2 - Structuring the DOM tree
Now consider a web page with the following HTML code:
<!DOCTYPE html>
<html>
    <head>
        <title>My Images</title>
    </head>
    <body>
        <h1>My images</h1>
        <p>Here are my images</p>
        <div>
            <img src='logo.jpg'>
        </div>
        <hr/>
        <div>
            <a href='images'>
                <img src='image1_small.jpg'>
                <img src='image2_small.jpg'>
                <img src='image3_small.jpg'>
            </a>
        </div>
        <img src='image1'/>
        <img src='image2'/>
        <img src='image3'/>
        <img src='image4'/>
        <img src='image5'/>
    </body>
</html>
Draw the tree corresponding to the HTML code of this web page (the body tag is the root of the DOM tree).
Draw the rendering of this web page, showing the boxes.
What happens if you remove the
<div>tags (in the DOM and in the rendering)?
Project - Image wall
We will continue the web application that displays images (see Chapter 1, project). This web application must consist of a home page (index.html) and a page containing the image wall (images.html). We will add one HTML page per image.
You can see the expected result here.
Create a directory chap2-projet into which you copy the files server.js, index.html and images.html.
Download the file images.zip. Unzip it and save five images of your choice, along with their thumbnails, in a directory named images inside the chap2-projet directory.
Add one HTML page per image to the
chap2-projetdirectory (image1.html, image2.html, etc.).Modify the file server.js so that the server delivers all the HTML files and all the images with their thumbnails. The server must therefore deliver seventeen resources (five images, five thumbnails, five image pages, the image wall page and the index page).
Modify the HTML code of the page index.html to display the heading My Image Wall (
<h1>tag). Add a link to the page images.html to this page (<a>tag).Modify the HTML code of the page images.html so that the five thumbnails are displayed, can be clicked, and display the corresponding full-size image when clicked. Make sure the five thumbnails are displayed on the same horizontal line.
Modify the HTML code of the page images.html again so that the five thumbnails are now displayed one above the other (do this using the
<div>tag).Modify the HTML code of the page images.html once more so that the five thumbnails are now displayed on two lines, with at most three images per line (do this using the
<div>tag).Modify the HTML code of the page images.html so that clicking on a thumbnail displays the corresponding HTML page. For example, clicking on the first image must lead to the page image1.html.
Modify the pages image1.html, image2.html, image3.html, image4.html and image5.html so that they match the layout in the following figure (clicking on the Prev and Next thumbnails displays the corresponding HTML page). Make sure to set a maximum width for the images (width property).
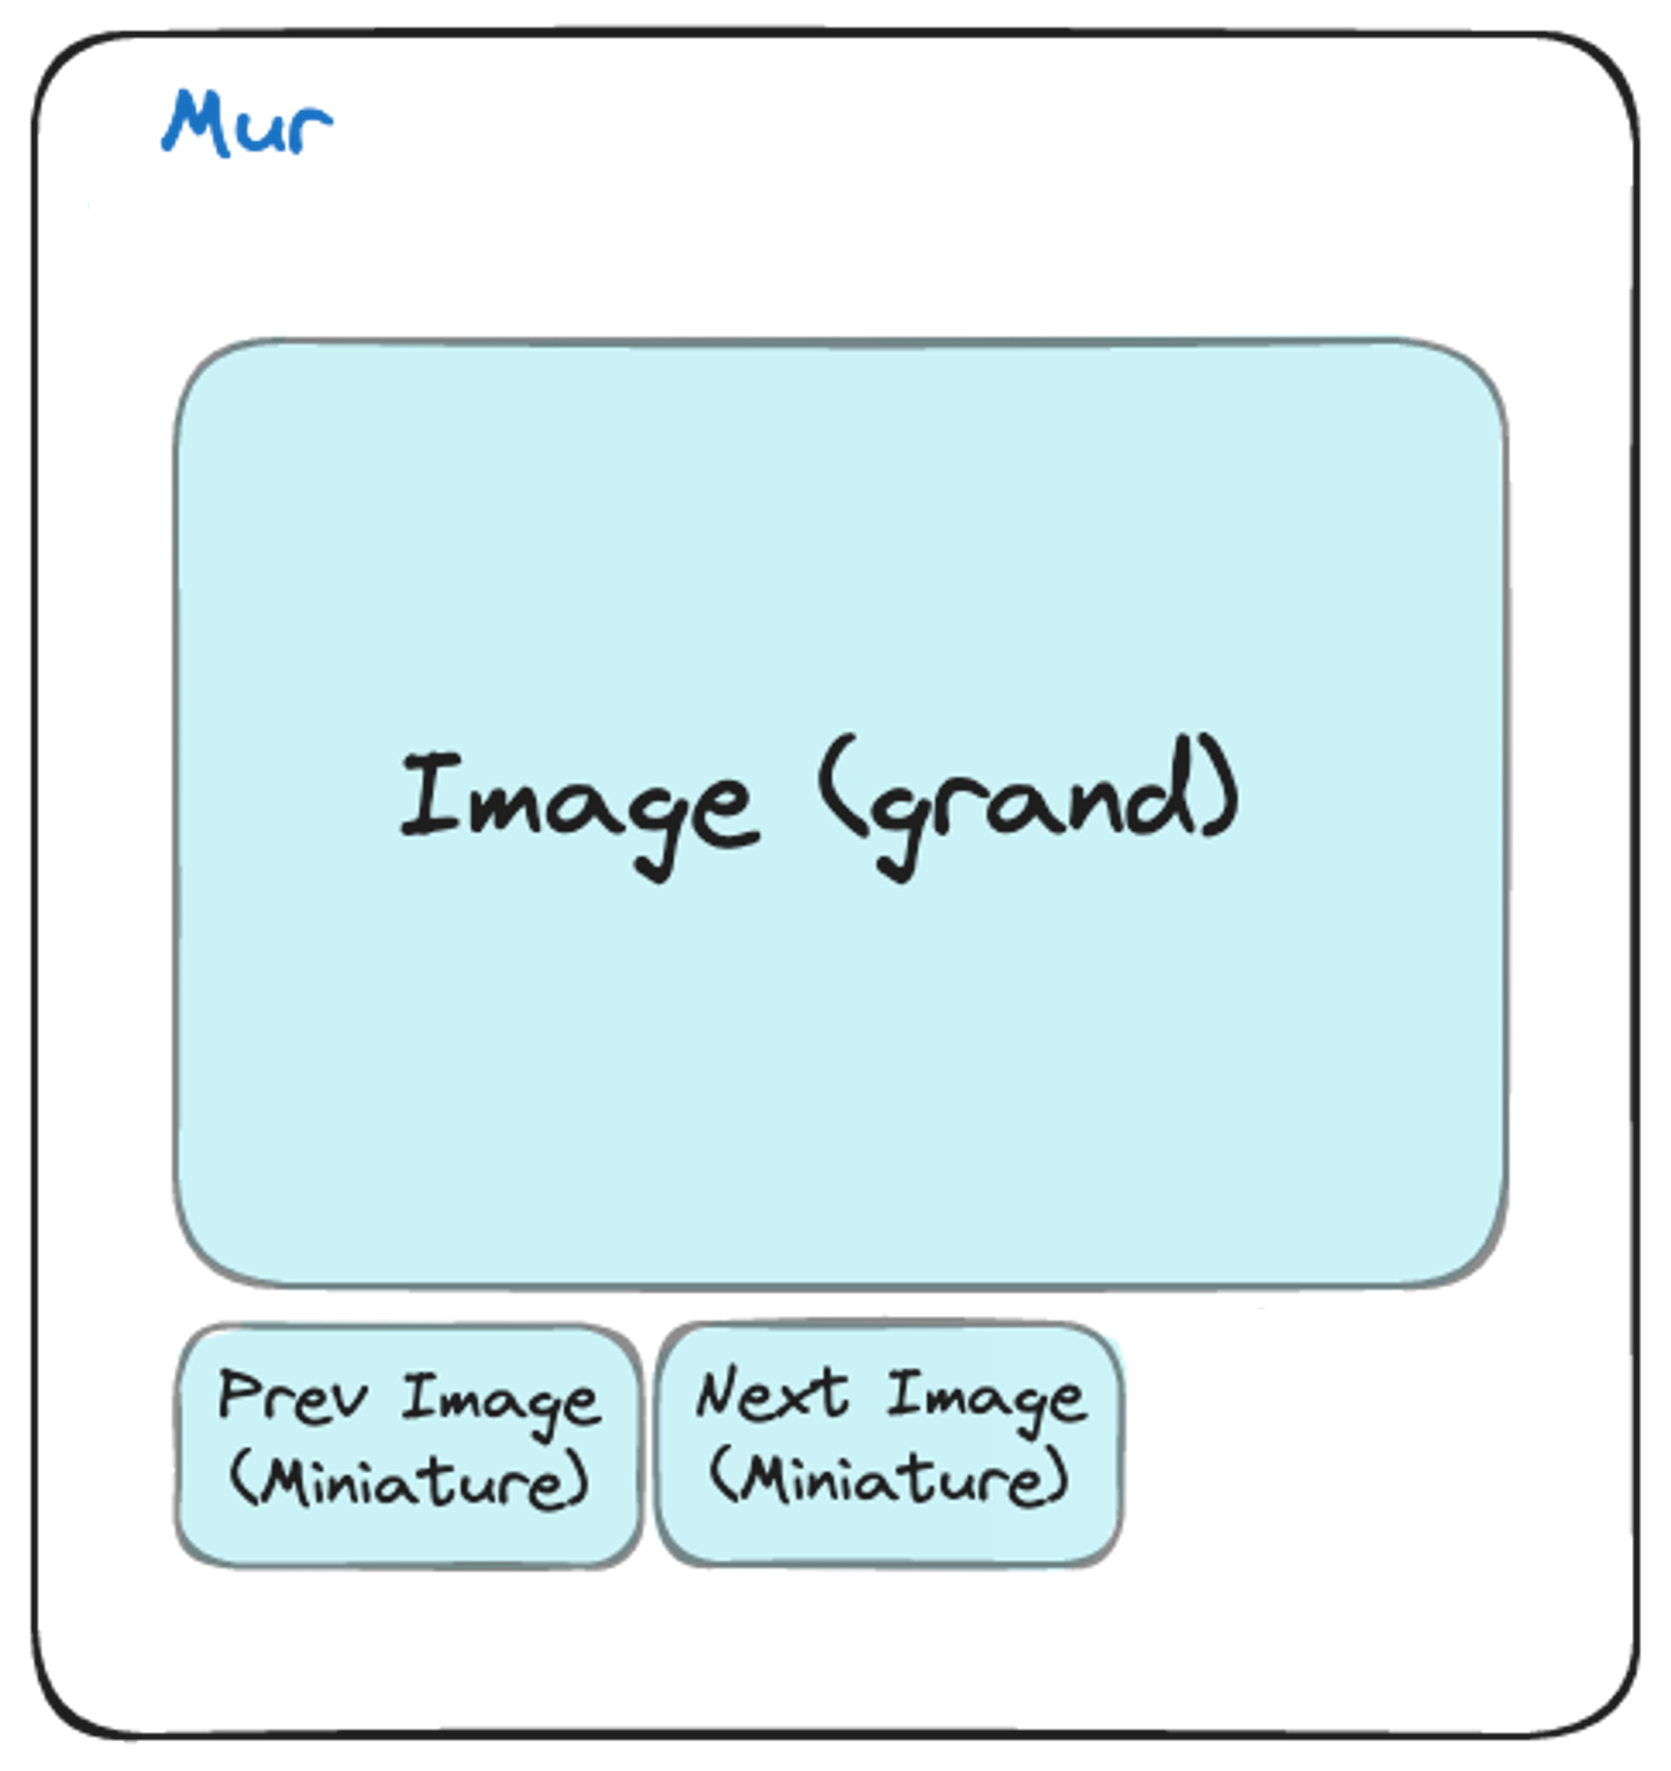
Figure 2.6: Layout of the web page displaying an image.