Chapter 9 - Event Handling in JavaScript
Browsers can run JavaScript code in a web page and thus support rich and complex interactions. For example, you can make elements of a page appear or disappear when a button is clicked, display new information when the page is scrolled down, automatically fill in form fields based on the first characters typed, or even regularly send HTTP requests in the background to update the web page silently.
This chapter presents how to code these interactions in JavaScript in the browser. We explain how to manipulate a web page in JavaScript and how to trigger processing in response to user events.
JavaScript in the browser
Every web browser associates a unique, independent JavaScript environment with each web page it displays. Every time the browser loads a page, it creates a new JavaScript environment dedicated to that page. This environment has its own memory and its own execution engine.
The developer tools built into web browsers give access to this JavaScript environment.
Using the console, you can even run JavaScript code in the environment associated with the current web page.
For example, Figure 9.1 shows a web page with JavaScript instructions executed in the browser's JavaScript console (1+1, let message = 'je peux exécuter du code', meaning "I can run code", and console.log(message)).
The instructions executed here are ordinary JavaScript instructions.
A variable was created (the variable message).
It remains accessible in the environment until another web page is loaded.
Indeed, loading a new page builds a fresh environment in which this variable no longer exists.
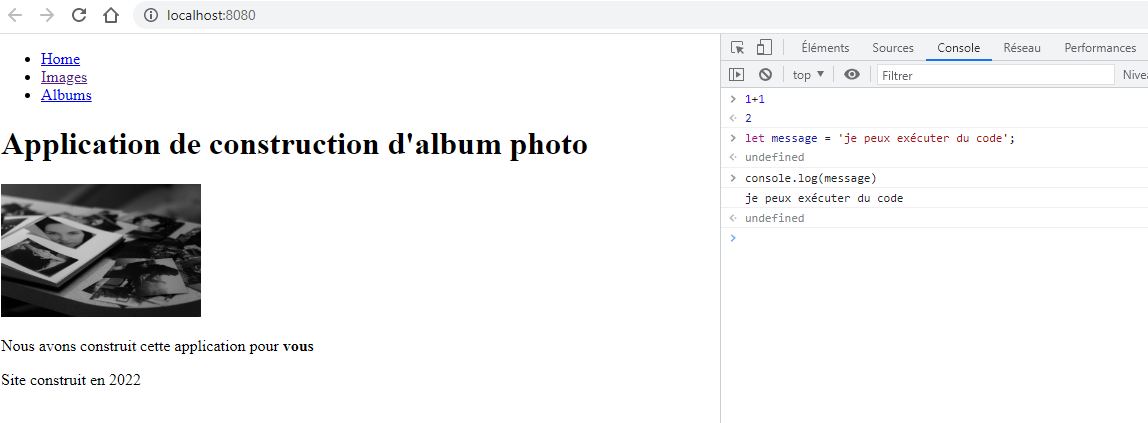
Figure 9.1: The JavaScript console in the developer tools, with a few instructions executed.
The JavaScript environment associated with a web page is isolated to the page for which it was created. As a result, it has no access to the environments of other pages that the browser may have open. Nor does it have access to the content of the hard drive or to other resources of the computer. Finally, to guarantee a high level of security, the environment restricts the HTTP requests it can send: by default, it can only read the responses from the server that delivered the current page (this is called the same-origin policy).
The "window" and "document" objects of the DOM API
The JavaScript environment associated with a web page is initialized with several JavaScript objects used to manipulate the displayed page. These objects are provided by the DOM (Document Object Model) API, a programming interface standardized by the W3C. Our goal here is not to describe the DOM API in detail, but to illustrate how to use it to read and modify a web page. A closer reading of the documentation will reveal all the objects and functions it offers.
We begin our presentation of the DOM API with the window object, which is particularly important.
It represents the browser window that displays the web page.
This object offers several properties that give information about the window and the displayed page.
Code 9.1 shows some of these properties and explains their meaning.
You can see that it is possible to know the size of the window, the URL of the page and some information about the browser.
You can also see that the page's HTML document is accessible via the document property.
window.innerHeight // Height of the window
window.innerWidth // Width of the window
window.location // URL of the page
window.navigator // Information about the browser
window.screen // Information about the screen
window.document // HTML document of the page
Code 9.1: Some properties of the window object.
The document property of the window object references an object representing the HTML document of the displayed page.
This object is directly accessible in the JavaScript environment: it is the document object.
The document object offers many properties and methods for manipulating the HTML document.
It offers the body property, which gives access to the body of the HTML document (<body> tag).
It also offers the head property, which gives access to the head of the HTML document (<head> tag).
Exploring a web page
Every element of a web page's HTML document is represented by a JavaScript object.
These objects are structured as a tree that reflects the structure of the HTML document.
To access these objects, you traverse this tree structure starting from the document object.
More precisely, you use the children property, which gives the list of children of any element.
Thus document.children gives access to the children of the document (the <html> element), and document.documentElement.children to the children of <html>.
Likewise, document.body.children gives access to the children of <body>.
The children property is an array-like collection containing the children in the order in which they appear in the HTML document.
You can therefore access a particular child using its index in the collection.
For example, document.body.children[0] gives access to the first child of <body>.
Code 9.2 shows an example HTML document and Code 9.3 shows how to access HTML elements by traversing the tree of elements.
For example, you can access the first image with the expression document.body.children[1].children[0] (note that the first child has index 0).
<html>
    <head>
        <title>Example page</title>
    </head>
    <body>
        <h1>Title</h1>
        <div id="images">
            <img src="/public/images/image1.png">
            <img src="/public/images/image2.png">
        </div>
        <div id="commentaires">
            <div class="commentaire">Very nice picture</div>
        </div>
    </body>
</html>
Code 9.2: Example HTML document.
document.body.children[0] // Access to <h1>
document.body.children[1] // Access to <div id="images">
document.body.children[1].children[0] // Access to the first child of <div id="images">, i.e. the first image
Code 9.3: Accessing HTML elements by traversing the tree of elements.
Traversing the tree of HTML elements can be tedious.
You need to know the structure of the HTML document to reach a particular element.
Another way is to use methods that access elements by their id attribute or their CSS class.
The getElementById method, for example, gives access to an HTML element by its id attribute.
The getElementsByClassName method gives access to a set of elements by their CSS class.
There are also the querySelector and querySelectorAll methods, which access elements given a CSS selector.
These methods can be used on the document object, and getElementsByClassName, querySelector and querySelectorAll can also be used on any other HTML element.
They search for elements starting from the element on which they are called.
For example, document.getElementById("images") calls the getElementById method on the document element.
It searches for an element whose id attribute equals images, starting from the document element, which is the root of the HTML page.
The example document.body.children[1].querySelectorAll("img") calls the querySelectorAll method on the element document.body.children[1].
It searches for all <img> elements starting from the second child of the <body> element.
Note that these access methods can be chained.
For example, document.getElementById("images").querySelectorAll("img") calls the querySelectorAll method on the element returned by calling getElementById on the document element.
It first finds the element whose id attribute equals images, starting from document, then, starting from that element, all the <img> elements.
Code 9.4 shows examples of these methods.
document.getElementById("images") // Access to the <div id="images"> tag
document.getElementsByClassName("commentaire") // Access to the <div class="commentaire"> tags
document.querySelector("#images") // Access to the <div id="images"> tag
document.querySelectorAll(".commentaire") // Access to the <div class="commentaire"> tags
document.getElementById("images").querySelectorAll("img") // Access to the <img> tags inside <div id="images">
document.getElementById("images").children[0] // Access to the first child of the <div id="images"> element
Code 9.4: Accessing elements with the access methods.
Once you have accessed an element in JavaScript, you can find out everything about it.
For example, you can read the src property of an <img> element to know the URL of the target image.
You can also read the href property of an <a> element to know the URL of the target page.
Many properties can be read, depending on the type of HTML element.
Some properties, however, are common to all HTML elements (see the documentation: https://developer.mozilla.org/en-US/docs/Web/API/Element).
This is the case of the innerHTML property, which gives the HTML content of an element (as text).
Code 9.5 shows an example using these properties and methods.
This example finds the element whose id is images, then, starting from it, finds all the <img> elements and displays their target URL (src property).
let imagesDiv = document.getElementById("images");
let images = imagesDiv.querySelectorAll("img");
for (let i = 0; i < images.length; i++) {
    if (images[i].src) {
        console.log(images[i].src);
    }
}
Code 9.5: Accessing images and displaying their target URLs.
Modifying a web page
Elements and their properties can be accessed not only for reading but also for modification. You can thus modify the content of an element by changing the values of its properties.
You must understand that changing the value of a property of an element asks the browser to repaint the page, and therefore to load the resources needed to do so.
Thus, if you change the src property of an <img> element and give it a new target image, the browser loads the new target image and replaces it in the page.
Code 9.6 shows an example that modifies the target URLs of the images.
This code iterates over all the images inside the <div id="images"> tag and replaces their src property so that the images displayed are the thumbnails (small).
Note that changing the page many times in a row can be costly if the number of images is large; browsers try to group repaints, but it is often better to build the new content first and insert it in a single operation.
let imagesDiv = document.getElementById("images");
let images = imagesDiv.querySelectorAll("img");
for (let i = 0; i < images.length; i++) {
    if (images[i].src) {
        images[i].src = '/public/images/image'+(i+1)+'_small.png';
    }
}
Code 9.6: Modifying the target URLs of the images.
You can also modify the innerHTML property, or the children of an element, to drastically change the structure of a web page.
Here again, these changes trigger a new painting of the page and therefore the loading of new resources.
Code 9.7 shows an example that modifies the structure of a web page.
Applied to Code 9.2, this code replaces the content of the <div id="images"> tag with <p>All the images have been removed</p>.
let imagesDiv = document.getElementById("images");
imagesDiv.innerHTML = '<p>All the images have been removed</p>';
Code 9.7: Modifying the structure of the web page: removing the images.
Finally, the document object of the DOM API offers the createElement method to create a new HTML element.
This method takes as a parameter the name of the HTML tag to create.
For example, document.createElement("img") creates a new <img> element.
The new element is created but not yet inserted into the HTML document, so it is not displayed.
Other methods must be used to insert it into the tree structure.
For example, the appendChild method adds an element at the end of the list of children of another element.
Code 9.8 shows an example of creating an element.
This code creates a new <img> element, gives a value to its src property, then inserts it as the last child of the <div id="images"> tag.
Applied to Code 9.2, this code adds the tag <img src="/public/images/image3_small.png"/> as the last child of the <div id="images"> tag.
let newImage = document.createElement("img");
newImage.src = '/public/images/image3_small.png';
let imagesDiv = document.getElementById("images");
imagesDiv.appendChild(newImage);
Code 9.8: Creating a new element (an image) and inserting it into the web page.
Handling events
JavaScript support in the browser makes it possible to handle the events triggered by user actions. More than eighty types of events can be captured by the browser. For example, you can capture events triggered by mouse clicks (click, dblclick), by mouse movements (mousemove, mouseover, mouseenter), by the keyboard (keypress, keydown, keyup), by the submission of a form (submit), by a change in the value of an input field (change), by the loading of a new page (load), etc.
An action performed by a user triggers an event of the corresponding type. This event is a JavaScript object with several properties describing the action that has just been performed. For example, the timeStamp property contains the time elapsed between the loading of the page and the action (in milliseconds). The target property references the element targeted by the action (the clicked element, for example). Other properties depend on the type of event. For example, keyboard events (keypress, keydown, keyup) have the key property, which describes the key that was used. The purpose of this chapter is not to describe all event types and their properties, but to show how to capture an event and how to use the information it contains.
The DOM API offers the addEventListener method to start capturing a type of event. This method has two parameters. The first parameter specifies the type of event to capture. The second parameter is a function that will be executed every time the event occurs. This function takes as a parameter the event object, which contains information about the captured event.
The addEventListener method must be called on an object that references an HTML tag.
This object delimits the area in which events are captured.
For example, Code 9.9 calls the addEventListener method on an object referencing the HTML tag whose id is images. In Code 9.2, this tag is the <div> tag containing the images.
Code 9.9 therefore captures events (here, clicks) within this area.
let imagesDiv = document.getElementById("images");
imagesDiv.addEventListener('click', (e) => {
    console.log(e.timeStamp);
})
Code 9.9: Capturing click events in the area delimited by the element whose id is images.
The code document.addEventListener('click', (e) => console.log(e.timeStamp)), on the other hand, calls the addEventListener method on the document element. The area delimited by the document object is the entire web page. With this code, all click events are captured. A message appears in the console showing the elapsed time.
Event propagation
JavaScript events are mostly triggered by user interactions (a click, typing in a form, scrolling, etc.). Event capture is limited to the area defined by the object on which the addEventListener method is called.
To take the capture area into account, JavaScript propagates events. To simplify, the event originates in the target element, the deepest one in the DOM tree, and then rises like a bubble (this is called bubbling) up to the root of the document. Thus, in our example of Code 9.2, if one of the images is clicked, the event is first created on the targeted image, then rises to the tag enclosing all the images, and rises again until it reaches the document. The JavaScript handlers defined on these elements run in the order of this upward journey.
Once the event has risen to the document, the browser takes over and performs the default action associated with the event.
For example, if you click on a hyperlink (<a> tag), the JavaScript event is created on the clicked element, rises to the document, and then the browser performs the default action, i.e. loading the page targeted by the hyperlink (the default action of the <a> tag).
This means that the declared JavaScript handlers run before the browser performs the default action.
JavaScript nevertheless offers two methods to modify event propagation: stopPropagation and preventDefault.
The stopPropagation method is called on an event. It stops the upward propagation (bubbling). If this method is called, none of the elements higher up in the DOM tree will receive the event. Using this method is discouraged, unless you really want to prevent the handling of events defined on tags higher up in the DOM.
The preventDefault method is also called on an event. It asks the browser not to perform the default action. This method is used quite frequently. A classic example is web forms. Code 9.10 shows a login form. Code 9.11 shows JavaScript code that captures the form's submission event (submit event). When such an event is fired, the code checks that the form fields are not empty; otherwise the form is not sent (preventDefault is called if one of the two fields is empty).
<html>
    <body>
        <form action="/login" id="login-form">
            <input type="text" id="fname" name="fname">
            <input type="text" id="lname" name="lname" >
            <input type="submit" value="Submit">
        </form>
    </body>
</html>
Code 9.10: Example HTML form.
let form = document.getElementById('login-form');
let fname = document.getElementById('fname');
let lname = document.getElementById('lname');
form.addEventListener('submit', (e) => {
    if (!fname.value || !lname.value) {
        alert('please enter First and Last names')
        e.preventDefault();
    }
})
Code 9.11: A check that the form fields are not empty. If one of them is, the form is not submitted.
Sending HTTP requests
In addition to accessing HTML elements and handling user events, JavaScript offers the fetch function to send HTTP requests. This function takes two arguments: the target URL of the request and an object containing the options of the request. These options specify, among other things, the type of the request (method), the headers (headers), the body of the request (body), etc.
The fetch function is asynchronous and therefore returns a JavaScript promise, which must be used with the then and catch methods, each taking a function as a parameter. The function passed to then is executed in case of success. It receives the response to the request as a parameter. The function passed to the catch method is executed if the request fails.
Sending HTTP requests with the fetch function is widely used to communicate with the server without the user noticing. For example, it is used to retrieve information and change the content of the web page dynamically. This is what web applications that regularly refresh information, such as scores or comments, do.
Code 9.12 illustrates the use of the fetch function. We assume that this code is called regularly (for example with the setInterval function). The goal is to receive new comments in order to add them to the web page (using the JavaScript methods for modifying the DOM). In the example, this code sends a request to the URL /commentaires. Since no options are given in the call, the default values are used (GET method with no specific header). As soon as the response arrives, the latest comments must be retrieved and added to the DOM (which is not coded in the example).
fetch('/commentaires')
.then((result) => {
    // retrieve the new comments
    // add them to the DOM
})
Code 9.12: A GET request sent in JavaScript to get the new comments. We assume they will then be added to the DOM.
Embedding JavaScript in a web page
JavaScript code is embedded in a web page with the <script> tag.
This tag can be placed anywhere in the HTML document.
The JavaScript code can be written directly inside the tag or be located in a referenced resource (the tag's src property).
The page in Code 9.13 shows three scripts embedded in a web page.
The first two scripts are written inside <script> tags, while the third is referenced (file script3.js, see Code 9.14).
The example shows that these three scripts run in the order in which they appear in the DOM.
The browser runs each script as soon as it has read it.
Finally, the example illustrates that these three scripts run in the same JavaScript environment.
They therefore share all declared variables.
In our example, the second script uses a variable declared by the first script (the variable script1) and defines a variable used by the third script (the variable script2).
<html>
    <head>
        <script>
            console.log('Script1');
            let script1 = true;
        </script>
    </head>
    <body>
        <h1>Javascript</h1>
        <script>
            console.log('Script2');
            if (script1) {
                console.log('Script1 was ok');
            }
            let script2 = true;
        </script>
    </body>
    <script type="text/javascript" src='/public/script3.js'></script>
</html>
Code 9.13: Illustration of embedding JavaScript in a web page.
console.log('Script3.js');
if (script2) {
    console.log('Script2 was ok');
}
Code 9.14: The third script run in the web page.
To make the code easier to read, it is recommended to put scripts in separate resources and reference them rather than writing them directly inside the tags.
Moreover, even though <script> tags can be placed anywhere in the HTML document, it is often recommended to place them in the <head> section.
The advantage is that you can quickly see which scripts are linked to the web page.
The problem with putting scripts in the <head> tag is that they are executed at the very beginning of the reading of the HTML document, before the whole DOM has been loaded.
This is a problem if the script must read or modify elements that are not yet loaded.
To deal with this problem, the defer attribute of the <script> tag asks the browser to defer the execution of the script until the whole DOM has been loaded.
Before the defer attribute was introduced, you had to listen for the load event (on the window object) and run the script in response to this event.
Code 9.15 illustrates these two approaches.
The execution of the first two scripts is deferred (defer attribute).
The third script runs when the load event is fired.
Both approaches achieve the same goal. The first has the advantage of being more readable.
<html>
    <head>
        <script type="text/javascript" src='/public/script1.js' defer></script>
        <script type="text/javascript" src='/public/script2.js' defer></script>
    </head>
    <body>
        <h1>Javascript</h1>

    </body>
    <script>
        window.addEventListener('load', (e) => {
            console.log('Script3.js');
            if (script2) {
                console.log('Script2 was ok');
            }
        });
    </script>
</html>
Code 9.15: Illustration of deferred script loading.
This chapter presents how to code rich interactions in a web page. Remember the following three points:
- Every browser provides a JavaScript environment in each web page. This environment runs JavaScript code.
- The JavaScript environments of web browsers provide objects for reading and modifying web pages. The DOM API defines these objects and their methods.
- You can code handlers that run in response to user events. This is done by capturing events and associating handlers with them.
Practice
Review questions
Can JavaScript be used to develop both the front end and the back end?
- a) No, JavaScript can only be used to develop the web server (the back end).
- b) No, JavaScript can only be used to develop the display and interactions in the web browser (the front end).
- c) Yes. JavaScript is the only language that can be used to develop the display and interactions in the web browser (the front end). It can also be used to develop the web server (the back end).
What is the DOM API?
- a) A front-end JavaScript API used to manipulate the elements of a web page.
- b) A back-end JavaScript API used to handle requests sent by web browsers.
- c) A JavaScript API used to process HTTP requests.
Which objects does the DOM API provide?
- a) Server and Client, used to send requests and receive responses.
- b) Window, which represents the web browser window, and Document, which represents the root of the HTML document.
- c) Request and Response, which represent an HTTP request and response.
Is it possible to modify a web page without sending an HTTP request?
- a) Yes, with JavaScript you can access DOM elements and modify their properties.
- b) No, an HTTP request must always be sent.
- c) No, it is impossible because you would need access to the database.
Does the DOM API offer ways to react to user events?
- a) No, the API is only used to browse the web.
- b) Yes, you can register a JavaScript function that runs every time the user performs an action.
- c) No, you can only know whether a new request has been sent.
Answers: 1-c, 2-a, 3-b, 4-a, 5-b
Exercise 1 - Using JavaScript on vanillacademy
The goal of this exercise is to understand JavaScript instructions by running them on the website https://vanillacademy.com
In your web browser, open the page https://vanillacademy.com/en and open the JS console in the developer tools (shift+ctrl+J).
Type the following command. Which element of the DOM does the variable titrePage (page title) reference?
let titrePage = document.querySelector('h1')
- What happens in the web page when you type the following command?
titrePage.textContent = "Great Course!"
- What happens in the web page when you type the following command?
titrePage.style.color = 'red'
Type the command that centers the title.
Open the page: https://vanillacademy.com/en/chapitre/1. Which DOM elements does the variable images reference when you run the following command?
let images = document.querySelectorAll('img')
- What happens in the web page when you type the following command?
images[0].style.border = 'solid 2px red'
- What happens in the web page when you type the following command?
images[0].style.border = 'none'
- What happens in the web page when you type the following command?
images.forEach((image) => image.style.border = 'yellow 2px solid')
Type the command that changes the display of all the images (either inline or block).
What happens when you type the following command?
let titrePage = document.querySelector('h1')
titrePage.addEventListener('click', () => console.log('click'))
Type the command that changes the display of all the images (either inline or block) when the chapter title is clicked.
What happens when you type the following command?
window.addEventListener("scroll",() => console.log('scroll'))
- What happens when you type the following commands?
let firstP = document.querySelectorAll('p')[0];
let nouvelleImage = document.createElement('img')
nouvelleImage.src = '/figures/chapitre1/chap1-fig1.png'
firstP.appendChild(nouvelleImage)
- Type the command that adds an image below the title when the page is scrolled.
Project - Image wall
We will continue our project that displays images (see Chapter 8, project).
The goal of this exercise is to add zooming to the image page. A left click on the image zooms in, while a right click zooms out.
You can see the expected result here.
Take the code you wrote in chapter 8 and copy it into a new directory named chap9-projet.
Open the page showing image no. 1: http://localhost:8080/page-image/1
In the JS console, write a script that defines the variable mainImage, which references the
<img>tag of the central image.Still in the JS console, use the variable mainImage to add a listener for the click event that adds 10 to the width of the image.
Still in the JS console, add a listener for the contextmenu event that subtracts 10 from the width of the image when the right button is clicked. Make sure to cancel the default behavior of this event (
e.preventDefault()).Copy your scripts into a file page-image.js and reference it in the page that displays an image. Check that these scripts are executed by the browser.
The goal of this exercise is to prevent the submission of the form used to comment on an image. The submit button will be disabled as long as the comment is empty.
You can see the expected result here.
Open the page showing image no. 1 again: http://localhost:8080/page-image/1
In the JS console, write a script that defines the variable submitButton, which references the submit button of the form.
Write a script that disables the button by setting its disabled property to true.
In the JS console, which DOM element does the variable
commentaire(comment) reference when you run the following command? And what does the value property correspond to?
commentaire
commentaire.value
Still in the JS console, write a script that registers a listener for the keyup event, which disables the submit button when the value of the comment is empty and enables it when the value of the comment is not empty.
Copy your scripts into the file page-image.js. Check that these scripts are executed by the browser.